


Maintaining the clarity and cleanliness of your vehicle's glass is essential not only for aesthetic appeal but also for safety and visibility. Auto glass detailing, a critical aspect of car care, ensures that your windows, windshields, and mirrors are free from dirt, water spots, and micro-abrasions. But with the rise in popularity of do-it-yourself (DIY) car care, many drivers find themselves asking: Is DIY auto glass detailing worth your time?
This article explores the pros, cons, techniques, and considerations involved in DIY auto glass detailing. By the end, you’ll have a clear understanding of whether taking this task into your own hands is a smart investment of your time and effort.
Understanding Auto Glass Detailing
Auto glass detailing involves a thorough cleaning, polishing, and treatment of all glass surfaces in a vehicle. Unlike a quick wipe with a window cleaner, detailing is a multi-step process that aims to remove grime, oxidation, water spots, tree sap, and even minor scratches. Professional detailers use specialized tools and products to restore clarity and enhance protection.
Auto glass detailing also includes the application of water-repellent coatings, which improve visibility during rain and prevent future buildup of contaminants. It plays a critical role in driving safety by ensuring unobstructed views through all windows and mirrors.
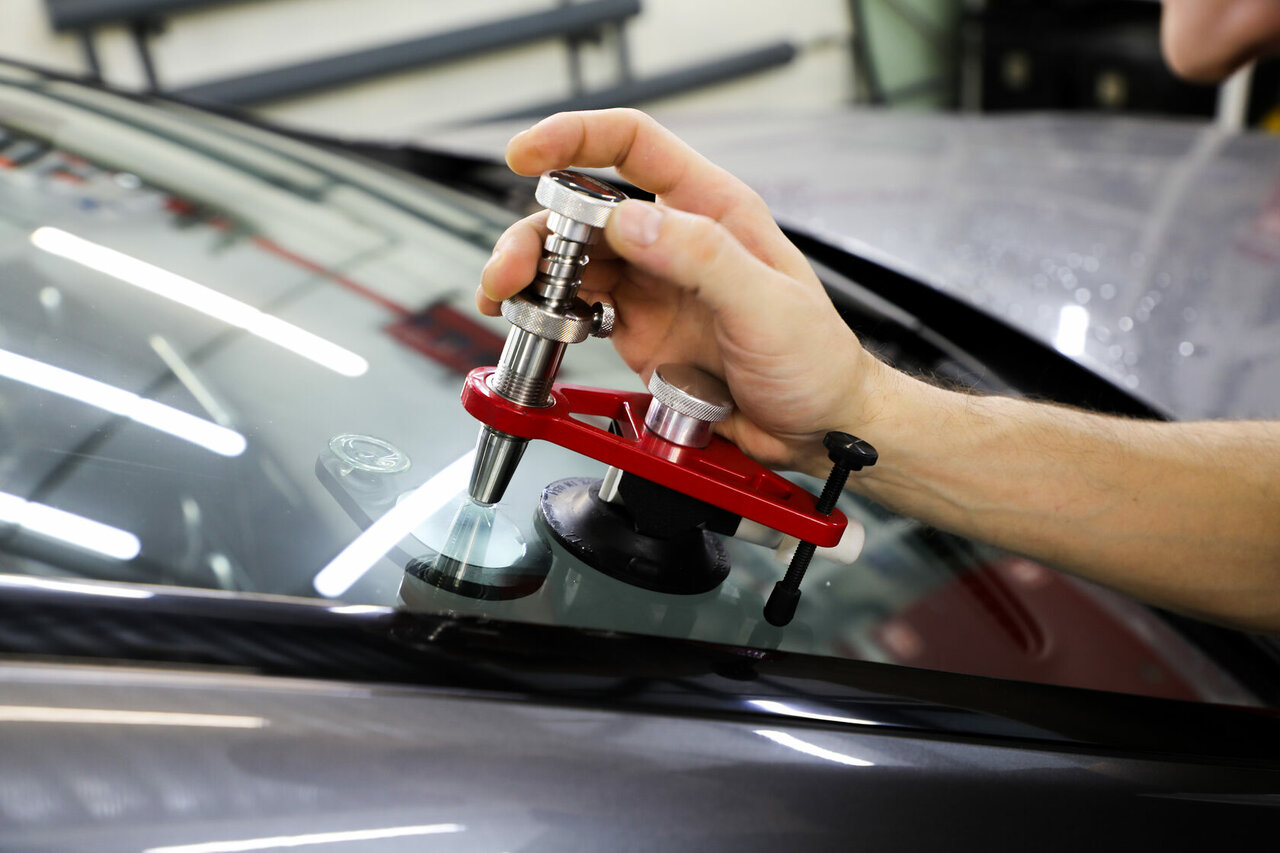
NOTE: Auto glass detailing was performed with industry-grade tools and proven methods. Haziness, scratches, and grime had been eliminated, revealing crystal-clear results. Drivers appreciated the noticeable difference.
Call to action: Experience the clarity — schedule your appointment at Windmaster Autocare LLC!
Tools and Products Needed for DIY Auto Glass Detailing
Before diving into a DIY project, it's important to understand what tools and materials are required. Here is a breakdown of essentials for auto glass detailing at home:
-
Glass cleaner: A high-quality, ammonia-free cleaner specifically made for auto glass.
-
Microfiber towels: Lint-free towels are essential for streak-free results.
-
Clay bar: Used to remove bonded contaminants from the surface.
-
Glass polish or compound: Helps restore clarity and remove light scratches or oxidation.
-
Water repellent coating: Such as Rain-X or a ceramic glass coating for long-term protection.
-
Detailing brushes or squeegees: Useful for corners, edges, and hard-to-reach areas.
With the right tools in hand, you can achieve results that are surprisingly close to professional standards.
Step-by-Step Guide to DIY Auto Glass Detailing
Step 1: Pre-Clean and Inspect
Start by removing loose dirt and debris using water and a basic wash. This prevents scratching during the detailing process. Carefully inspect the glass for any deep scratches, chips, or cracks, which may require professional repair.
Step 2: Deep Cleaning
Spray the auto glass cleaner generously and use a microfiber cloth in overlapping motions. Avoid circular movements that can create streaks. Repeat as necessary for heavily soiled areas.
Step 3: Decontamination with Clay Bar
Lubricate the glass and use a clay bar to remove embedded contaminants like tree sap or industrial fallout. This step is crucial for creating a smooth surface.
Step 4: Polishing the Glass
Apply a small amount of glass polish or compound to a microfiber applicator or a dual-action polisher. Work in small sections and buff thoroughly. This step helps reduce minor scratches and restores optical clarity.
Step 5: Applying Water Repellent Coating
Apply the coating as directed, usually with a cloth or sponge, and buff it out once cured. These coatings provide a hydrophobic layer that repels water, dirt, and grime.
Step 6: Final Wipe and Inspection
Finish with a clean microfiber towel and inspect your work under different lighting conditions to ensure no streaks or missed spots remain.
Benefits of DIY Auto Glass Detailing
There are several benefits to doing your own auto glass detailing, especially for those who enjoy car care and maintenance:
Cost Savings
Professional detailing can be costly, ranging from $50 to $150 or more for glass services alone. DIY allows you to save significantly, especially if you already own some of the tools.
Convenience and Flexibility
You can work at your own pace and choose the products you trust. For car enthusiasts, DIY detailing can also be a relaxing and satisfying experience.
Personal Satisfaction
There’s a tangible sense of achievement in taking care of your own vehicle. Seeing the before-and-after transformation provides a rewarding experience.
Drawbacks of DIY Auto Glass Detailing
Despite its benefits, there are some challenges and drawbacks to consider before diving in:
Time-Consuming Process
A thorough job takes time — typically one to three hours depending on the size and condition of the vehicle. If you're on a tight schedule, this may not be the best use of your time.
Learning Curve
Achieving professional-level results requires a certain level of knowledge and technique. Mistakes, such as using the wrong product or applying too much pressure, can lead to scratches or haze.
Inconsistent Results
Without proper tools or experience, it’s easy to miss spots or leave behind streaks. Professional detailers are trained to work under different lighting conditions to ensure uniform results.
When to Choose Professional Auto Glass Detailing
While DIY is suitable for regular maintenance and light cleaning, there are times when professional help is more appropriate:
-
Severe water spots or acid etching
-
Deep scratches or cracks
-
Ceramic coating applications that require curing lights
-
Fleet or commercial vehicles with larger surface areas
Professionals also use high-end equipment, such as rotary polishers and glass-specific machines, which provide deeper restoration than manual methods.
Cost Comparison: DIY vs Professional Services
To help you decide whether DIY is worth your time, consider the cost comparison:
| Item/Service | DIY Estimated Cost | Professional Service |
|---|---|---|
| Auto glass cleaner | $10 - $20 | Included |
| Clay bar | $15 - $25 | Included |
| Glass polish | $15 - $30 | Included |
| Water repellent coating | $10 - $25 | Included |
| Microfiber towels/tools | $20 - $50 | Included |
| Time investment | 1–3 hours | None (just drop off) |
| Total | $70 - $150 | $80 - $180 |
While DIY might save you money in the long run, the initial investment in tools and products can add up quickly, especially if you don’t already own detailing supplies.
Tips for Effective DIY Auto Glass Detailing
If you decide to go the DIY route, follow these tips to maximize your results:
-
Detail in the shade: Avoid direct sunlight to prevent streaking and premature drying.
-
Use separate towels: Have designated towels for cleaning and drying to avoid cross-contamination.
-
Work section by section: It helps maintain focus and ensures every area is covered thoroughly.
-
Check your work with a flashlight: This can reveal smudges or residue that are hard to spot in natural light.
Conclusion: Is DIY Auto Glass Detailing Worth It?
So, is DIY auto glass detailing worth your time? The answer depends on your priorities.
If you enjoy car maintenance, are willing to invest in the right products, and have the patience to learn proper techniques, then DIY auto glass detailing can be a fulfilling and cost-effective option. It gives you control, flexibility, and a sense of pride in maintaining your vehicle.
However, if your time is limited or if you seek showroom-quality results without the effort, professional detailing may be a more practical choice. For more advanced jobs, especially involving damaged or heavily stained glass, professional help is highly recommended.
Ultimately, the value of DIY lies in the experience as much as the results. If you’re up for the task, your vehicle — and your wallet — may thank you for it.
For more insightful articles related to this topic, feel free to visit: daddycow
Comments (0)