


There is a particular frustration that comes with traditional wall molding projects that few people talk about until you're in the thick of it yourself. You've spent hours measuring, you've double-checked your calculations, and you make that first cut with complete confidence, only to discover that your angles are slightly off or your measurements somehow don't translate to the actual wall. This experience has discouraged countless potentially beautiful home improvements, leaving walls bare and dreams deferred. Pre-cut wall molding kits have emerged as the elegant solution to this all-too-common problem, removing the mathematical anxiety that keeps so many people from attempting architectural details. These thoughtfully designed kits arrive with every piece precisely manufactured to fit together perfectly, eliminating the guesswork that traditionally separates inspiration from installation. The concept acknowledges that you shouldn't need to be a skilled carpenter or a geometry whiz to enjoy the timeless beauty of wall molding. By handling the complex calculations and precise cuts at the factory, these kits free you to focus on the creative and satisfying aspects of transforming your space, delivering professional results without requiring professional skills.
The Engineering Behind Precision-Cut Systems
Understanding what makes pre-cut wall molding kit so reliable begins with appreciating the sophisticated engineering that happens long before the box reaches your doorstep. Manufacturers use computer-aided design software to create digital models of every piece, ensuring that angles align perfectly and dimensions account for the subtle variations that can throw off manual installations. This digital precision translates to manufacturing processes that cut each piece to tolerances measured in fractions of millimeters, consistency that human hands simply cannot replicate with a miter saw in a garage workshop. The engineering extends beyond individual pieces to the system as a whole, with thoughtful design features like alignment tabs, registration marks, and numbered components that guide you through installation with confidence. Many premium kits include corner blocks specifically designed to eliminate the need for complex angled cuts altogether, transforming the most challenging part of traditional installation into the simplest step of your project. This engineering approach recognizes that your wall molding project should be judged by its final appearance, not by the hurdles you overcome to get there, and designs every element with that philosophy in mind.
Why Measurement Mistakes Happen to Everyone
Even experienced DIYers occasionally find themselves scratching their heads over measurements that somehow don't translate from paper to wall, and understanding why this happens reveals the true value of pre-cut systems. Walls that appear perfectly square and plumb to the naked eye often reveal slight deviations when measured with precision tools, with corners that aren't quite ninety degrees and floors that slope imperceptibly. These minor variations, insignificant in daily life, become major obstacles when you're trying to fit precisely cut molding pieces into place. Traditional installation requires accounting for these irregularities through careful measurement and on-the-fly adjustments, a skill that comes only with practice and often involves some waste as you learn. Pre-cut kits address this challenge by designing for real-world conditions rather than theoretical perfection. The pieces incorporate slight tolerances that accommodate typical wall variations, and the installation sequence guides you through compensating for irregularities without requiring complex calculations. This approach acknowledges that your walls are living elements of your home, subject to settling and shifting, and designs a system that works with these realities rather than fighting against them.
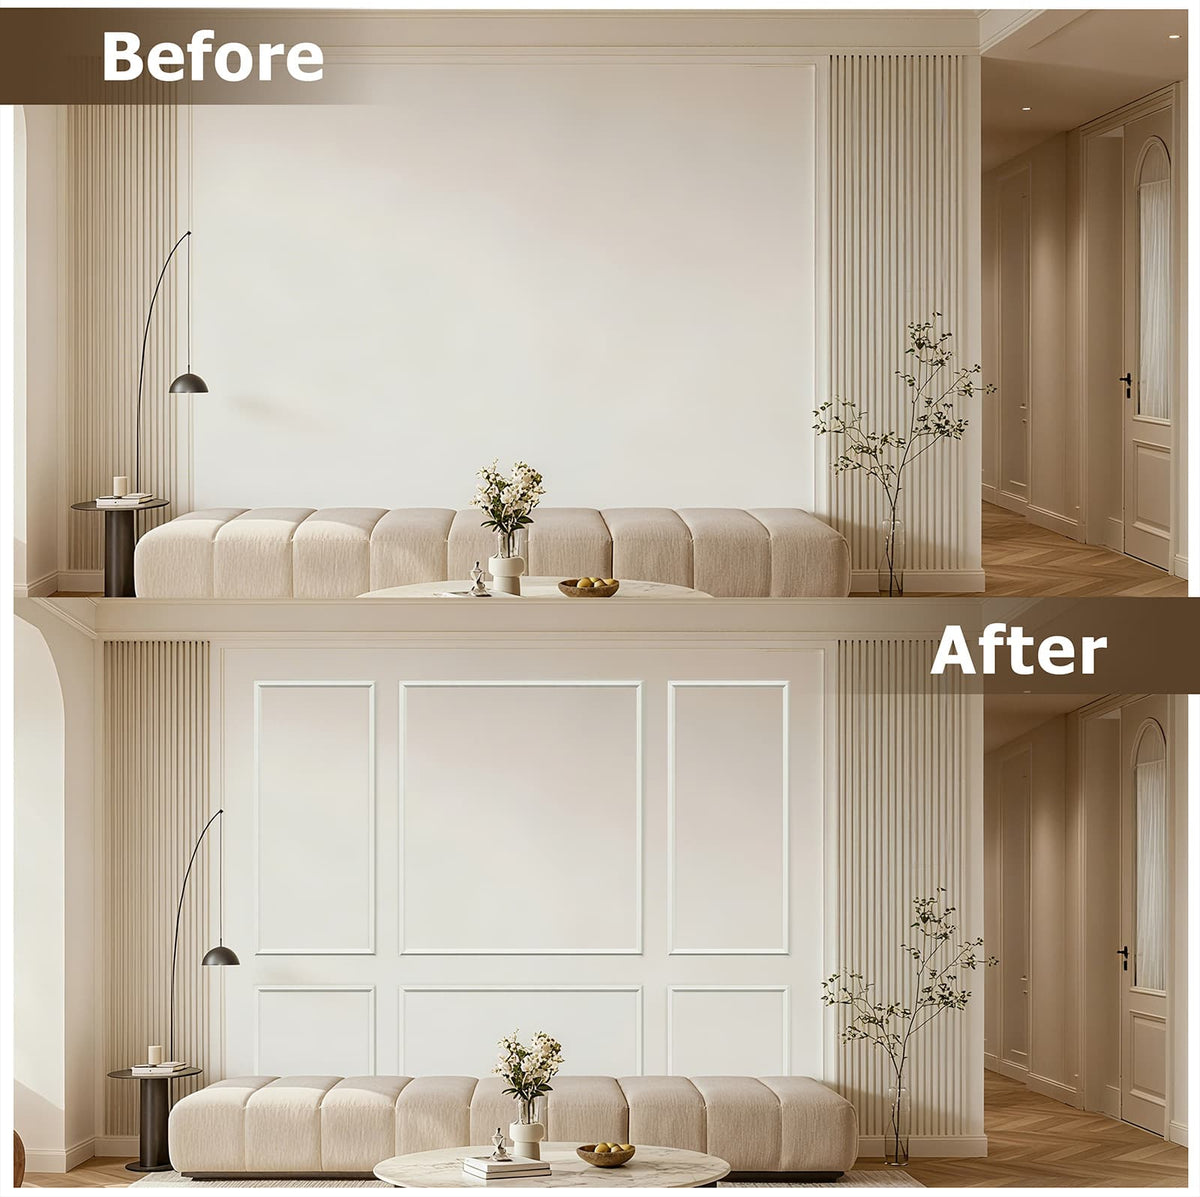
Selecting the Right Scale for Your Space
One of the most consequential decisions in any wall molding project involves choosing the right scale for your particular room, and pre-cut kits offer the advantage of seeing this decision through before you commit. The proportions of your molding panels fundamentally shape how your finished room feels, with larger panels creating a bold, dramatic statement and smaller, more numerous panels contributing to an intimate, traditional atmosphere. A living room with soaring ceilings can handle generously scaled panels that emphasize its grand proportions, while a cozy bedroom benefits from more delicate framing that feels appropriate to its scale. The width of the molding profiles themselves also matters significantly, with broader trim making a stronger architectural statement and narrower profiles receding more subtly into the background. Pre-cut kits allow you to evaluate these options before installation, comparing different scales against your actual walls through online visualization tools or simply holding pieces in place to assess the effect. You might discover that the design you admired in a magazine feels overwhelming in your space, or that you can safely go bolder than you initially considered. This ability to make scale decisions with confidence, knowing that the precision-cut pieces will fit together perfectly once you commit, transforms the design process from anxious speculation into assured creativity.
Navigating Corners and Transitions
The corners where walls meet and the transitions where molding intersects with doors, windows, and other architectural features represent the true test of any installation system. Traditional approaches require mastering the art of coping inside corners or achieving perfect miter cuts that align seamlessly, skills that take most DIYers years to develop. Pre-cut wall molding kits address these challenges through thoughtful design that simplifies rather than eliminates these critical junctions. Many systems incorporate specially designed corner blocks that receive straight-cut molding pieces, creating clean, professional transitions without requiring any angled cutting whatsoever. For installations where continuous molding wraps around corners, the pre-cut angles arrive factory-perfect, with complementary pieces designed to create seamless joints when installed according to the included sequence. Transitions to door and window casings receive similar attention, with pieces designed to butt against existing trim in ways that look intentional rather than improvised. This comprehensive approach to corners and transitions means that even first-time installers achieve results that look like years of practice, with clean lines and professional joins that elevate the entire installation.
The Installation Sequence That Builds Success
Opening a box of pre-cut molding reveals more than just carefully packaged pieces; it contains a logical system designed to guide you through installation in a sequence that builds success with every step. Quality kits typically begin with establishing reference lines that ensure everything that follows remains level and true, using the longest walls or most prominent features as anchors for the entire design. From there, you typically install the largest panel pieces first, establishing the grid that will contain smaller elements and provide visual structure. Corner elements and transitions come next, with their factory-perfect angles locking everything into proper alignment. The final pieces fill in remaining sections, with each element fitting precisely into the spaces created by previous installations. This thoughtful sequence means that your project looks better with every piece you add, building momentum and confidence rather than revealing problems as you progress. The numbered components and clear instructions eliminate guesswork about what goes where, allowing you to focus on proper placement and firm adhesion rather than puzzling over assembly order. By the time you place the final piece, the entire installation stands as a testament to thoughtful design and your capable execution.
Finishing Techniques for Seamless Integration
The moment all your pre-cut pieces are securely attached marks the beginning of the finishing phase, where careful attention transforms good installation into great results. The factory precision of your molding means that seams and joints already fit together beautifully, but a few finishing touches elevate everything to the next level. A high-quality, paintable caulk applied sparingly along any seams and at the edges where molding meets wall creates the illusion of continuous, custom-crafted installation. The key lies in applying just enough to fill the joint, then smoothing with a damp finger or specialized tool to create a perfectly flush transition. Once the caulk dries, a light sanding with fine-grit paper smooths any minor imperfections and prepares surfaces for paint. The painting itself deserves care, with quality primer ensuring proper adhesion and your chosen paint color transforming the assembled pieces into an integrated architectural feature. For the most seamless look, paint the entire wall and molding together after installation, allowing the color to unify everything into a cohesive whole. If you prefer contrast, carefully cut in along the molding edges, using steady hands and quality brushes designed for detailed work. This finishing phase, while requiring patience, delivers the reward of watching your precisely cut pieces transform from individual components into a finished room that looks professionally designed and installed.
Adapting to Different Wall Conditions
Every home presents unique wall conditions that can challenge even the most thoughtfully designed installation, and understanding how pre-cut systems accommodate these variations helps you prepare for success. Plaster walls in older homes often feature subtle waves and irregularities that reflect their handcrafted origins, while newer drywall installations might have visible seams or texture variations. Quality pre-cut molding kits include flexibility in their design, with pieces that can conform to minor undulations and instructions for addressing more significant challenges. For walls with pronounced texture, a quick pass with sandpaper over high spots creates smoother areas for better adhesion. Where walls curve or bow beyond normal variation, the installation sequence might suggest starting from the most prominent high point and allowing pieces to follow the wall's natural contour. The factory precision of the pieces ensures that even when walls aren't perfect, your molding installation maintains consistent relationships and professional appearance. This adaptability means that pre-cut kits work beautifully across the full spectrum of housing stock, from century-old characters to brand-new construction, delivering reliable results regardless of what lies beneath.
Comments (0)