
Remember me

In this article, you will learn how to build and embed an agentic Python assistant using the GitHub Copilot Agentic Coding SDK, including custom tools and multi-turn context.
Topics we will cover include:
How agentic assistants differ from traditional automation and chat-style tools. How to set up the GitHub Copilot SDK in Python and run a basic tool-using agent. How to add file-access tools, permission handling, and multi-turn memory.Let’s not waste any more time.
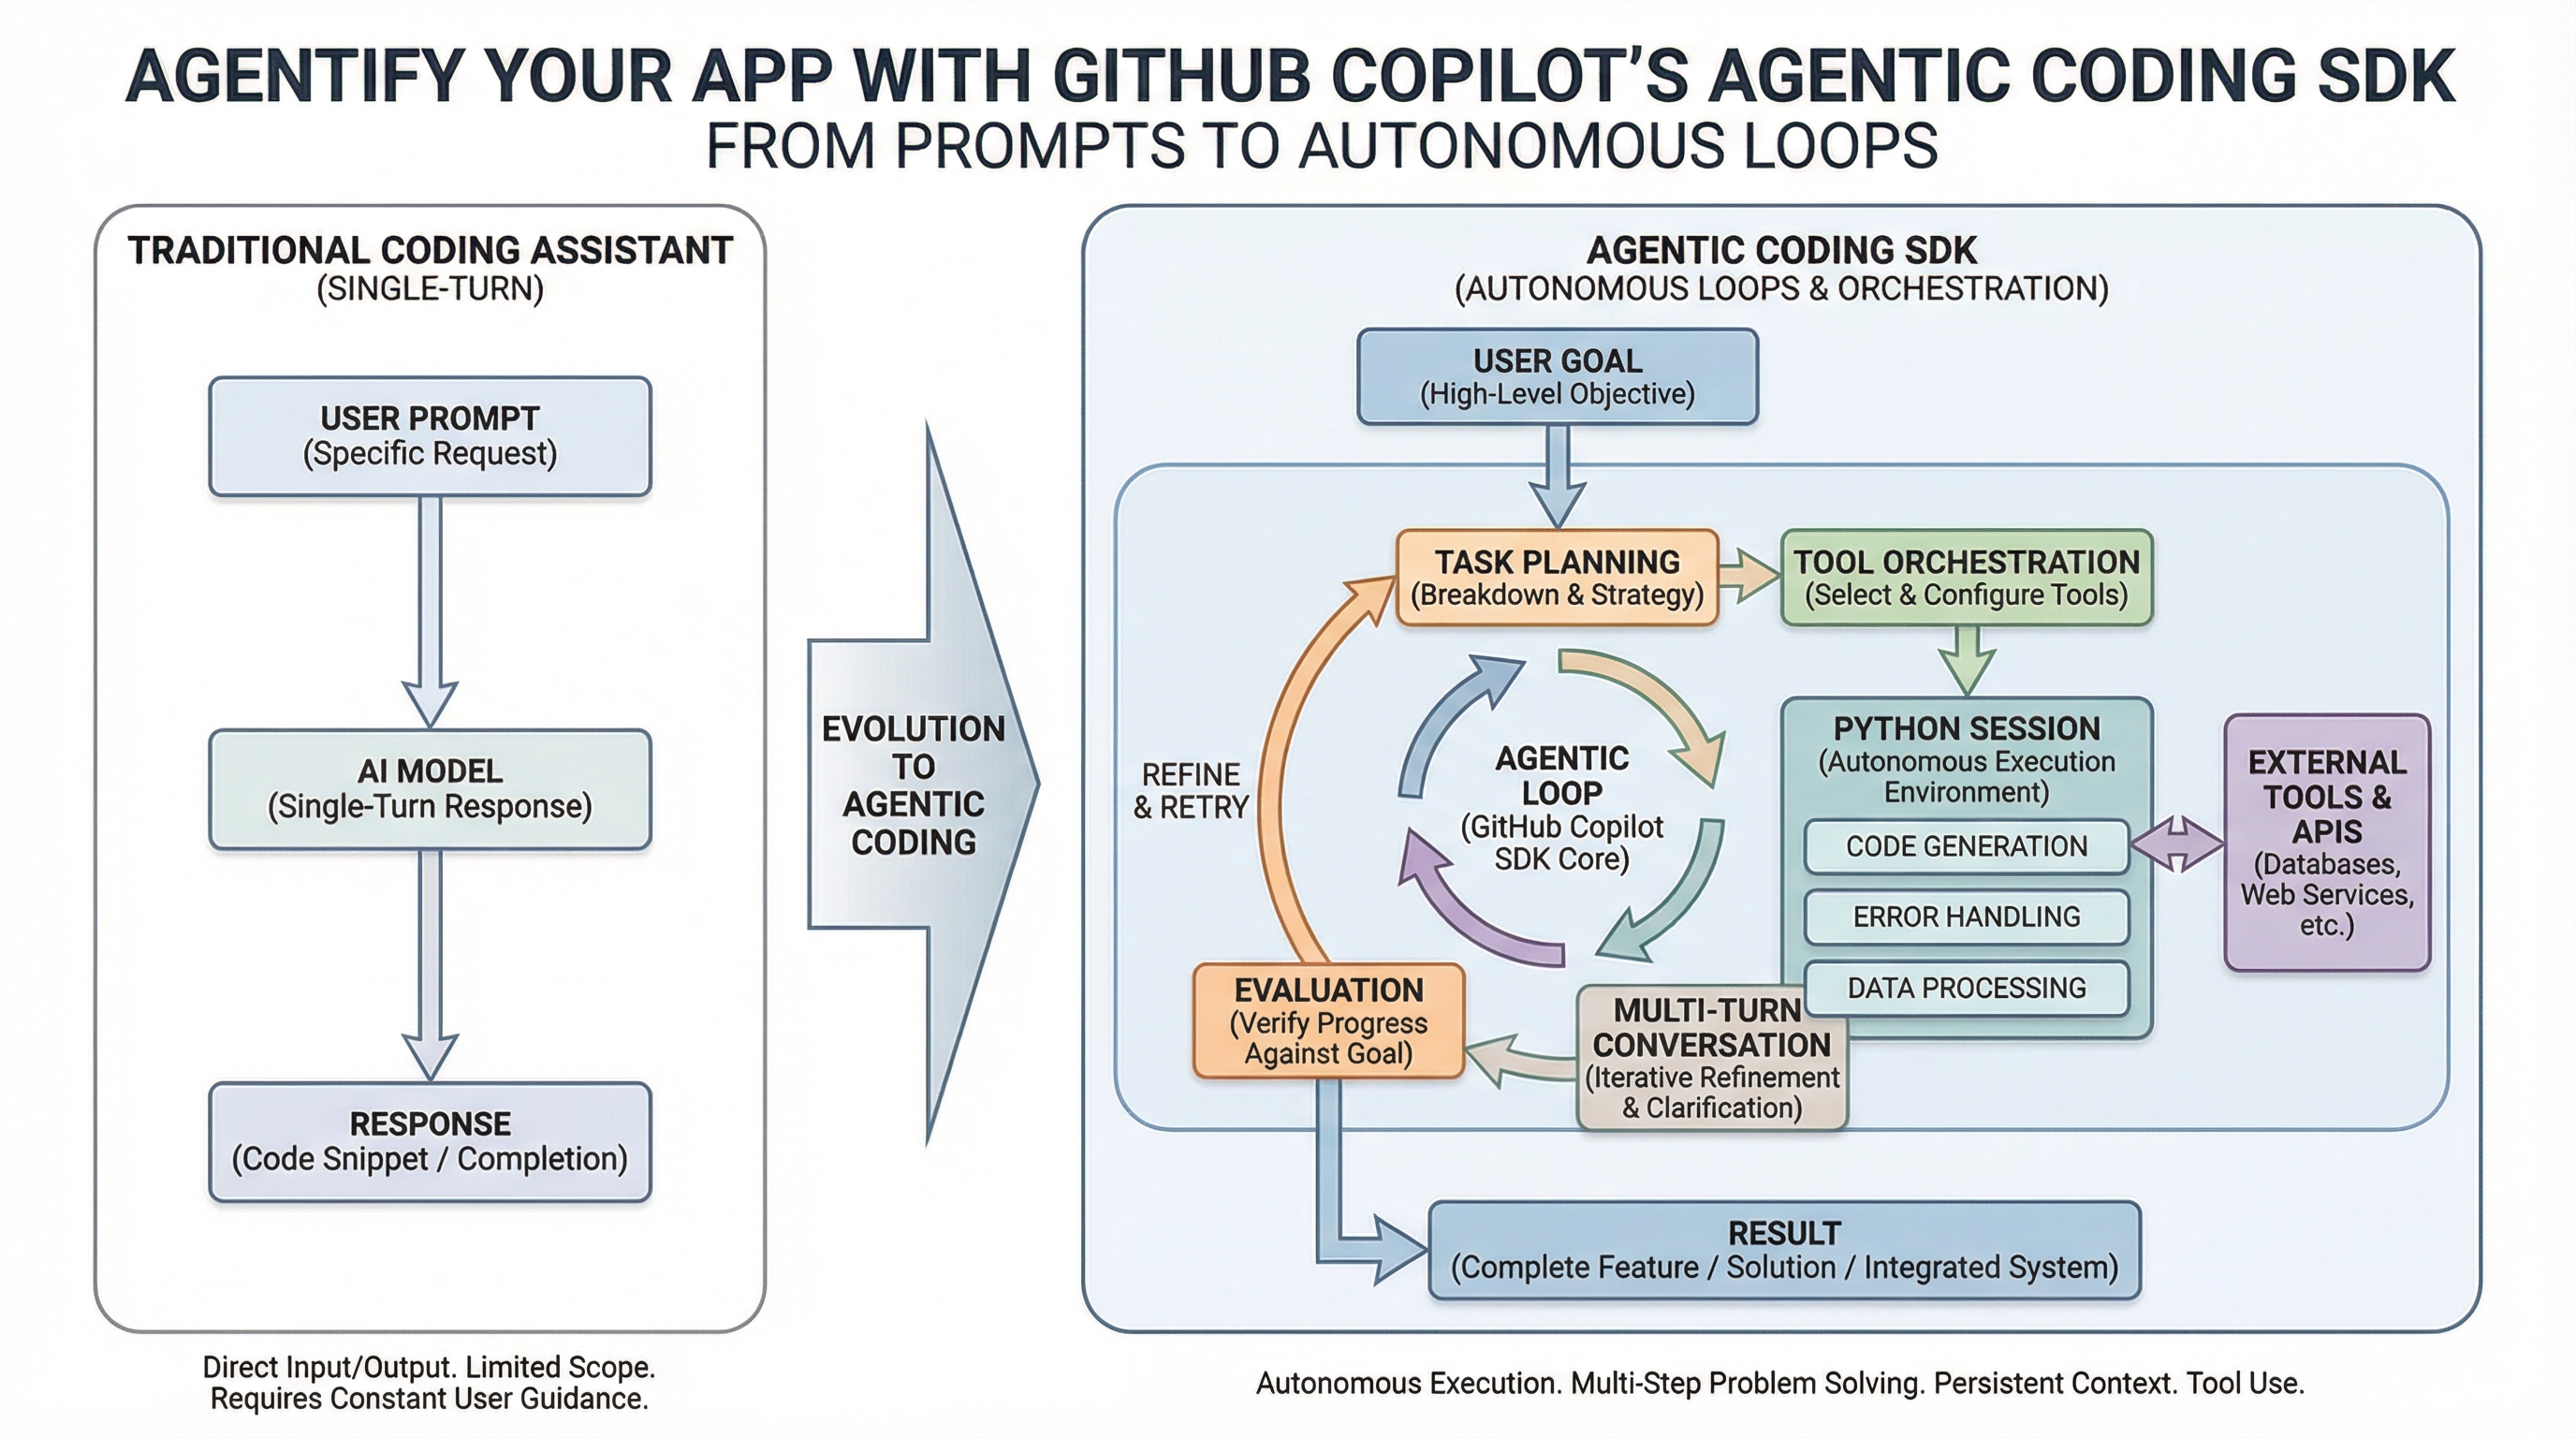
Agentify Your App with GitHub Copilot’s Agentic Coding SDK (click to enlarge)
Image by Editor
For years, GitHub Copilot has served as a powerful pair programming tool for programmers, suggesting the next line of code. The new GitHub Copilot Agentic Coding SDK changes the game, transforming Copilot from a reactive helper into an autonomous assistant you can integrate into your applications. Imagine assigning a complex task to a junior developer who can plan, execute, and report back — that’s the power of an agent.
In this article, I will guide you through building your first agentic Python application using this SDK.
Think of a traditional coding tool as a very smart keyboard that predicts the next word. An AI agent is more like a dedicated assistant that you set a goal for, and it figures out the steps, uses the right tools, and gets the job done without needing your help for every single decision. For a data scientist, this could mean creating an agent that, when given a raw dataset, can autonomously clean it, run an analysis, and generate a report.
This new approach allows you to move beyond simple automation to creating systems that understand context and make decisions. Here’s a comparison of the two paradigms:
Aspect Traditional Automation/Chat Agentic Assistant (via SDK) Interaction Single-turn query and response Multi-turn, goal-oriented conversation Capability Answers questions, suggests code Plans, executes commands, edits files, runs tests Integration External tool or IDE plugin Programmatically embedded into your own Python, Node.js, Go, or .NET apps Complexity Manages simple prompts Handles context, tool orchestration, and permissions for you How To Get Started With Your First Agent Using PythonWe are going to demo how to integrate the GitHub Copilot SDK into a Python application.
The SDK exposes the same agentic engine behind Copilot CLI as a programmable SDK.
myenv\Scripts\activate.bat
myenv\Scripts\activate.bat
On Linux/macOSsource .venv/bin/activate
source .venv/bin/activate
GitHub Copilot CLInpm install -g @github/copilot
npm install -g @github/copilot
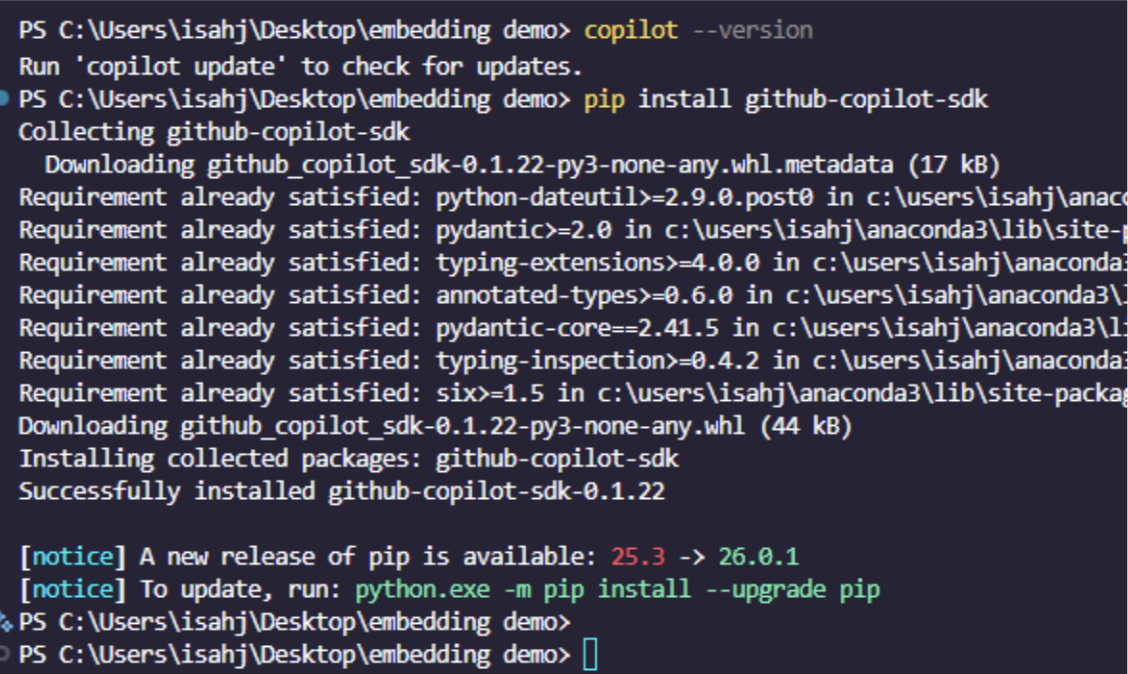
pip install github-copilot-sdk pydantic
pip install github-copilot-sdk pydantic
Output:
Authentication: The Copilot CLI uses your VS Code/GitHub authentication automatically. Make sure you’re logged into GitHub in VS Code with Copilot enabled. You can also run this command:
copilot -p "Hello" --allow-all-tools
copilot -p "Hello" --allow-all-tools
Note: If the CLI is installed via VS Code’s Copilot extension, you may need to specify the CLI path explicitly like this:
Then you can create a Python file and give it a name like basic_agent_demo.py. Then paste the following code in the file:
import asyncio import sys from copilot import CopilotClient from copilot.tools import define_tool from copilot.generated.session_events import SessionEventType from pydantic import BaseModel, Field # Step 1: Define custom tools using the @define_tool decorator. class GetDataVisualizationParams(BaseModel): library_name: str = Field(description="The name of the Python library to get info about") @define_tool(description="Get information about a Python data visualization library") async def get_library_info(params: GetDataVisualizationParams) -> dict: """Custom tool that provides information about data visualization libraries.""" libraries = , "seaborn": , "plotly": , } library = params.library_name.lower() if library in libraries: return libraries[library] return ' not found. Try: matplotlib, seaborn, or plotly"} async def main(): # Step 2: Create and start the Copilot client with an explicit CLI path. # The SDK needs to find the Copilot CLI, so specify the path explicitly. client = CopilotClient() print("🚀 GitHub Copilot SDK Demo - Agentic Coding in Action") print("⏳ Starting Copilot client (this may take a moment)...\n") await client.start() print("=" * 60) # Step 3: Create a session with custom configuration. session = await client.create_session() print(f"Session created: \n") # Step 4: Set up event handlers for streaming. def handle_event(event): if event.type == SessionEventType.ASSISTANT_MESSAGE_DELTA: # Stream the response as it arrives. sys.stdout.write(event.data.delta_content) sys.stdout.flush() elif event.type == SessionEventType.TOOL_EXECUTION_START: print(f"\n🔧 Tool called: ") session.on(handle_event) # Step 5: Send a prompt and let the agent work. print("📝 User: List three common Python libraries for data visualization and their main use case.\n") print("🤖 Assistant: ", end="") await session.send_and_wait() print("\n\n" + "=" * 60) # Step 6: Clean up. await session.destroy() await client.stop() print("✅ Session ended successfully!") if __name__ == "__main__": asyncio.run(main())
1
2
3
4
5
6
7
8
9
10
11
12
13
14
15
16
17
18
19
20
21
22
23
24
25
26
27
28
29
30
31
32
33
34
35
36
37
38
39
40
41
42
43
44
45
46
47
48
49
50
51
52
53
54
55
56
57
58
59
60
61
62
63
64
65
66
67
68
69
70
71
72
73
74
75
76
77
78
79
80
81
82
83
84
85
86
87
88
89
90
91
92
93
94
95
96
97
98
99
100
101
102
103
104
import asyncio
import sys
from copilot import CopilotClient
from copilot.tools import define_tool
from copilot.generated.session_events import SessionEventType
from pydantic import BaseModel, Field
# Step 1: Define custom tools using the @define_tool decorator.
class GetDataVisualizationParams(BaseModel):
library_name: str = Field(description="The name of the Python library to get info about")
@define_tool(description="Get information about a Python data visualization library")
async def get_library_info(params: GetDataVisualizationParams) -> dict:
"""Custom tool that provides information about data visualization libraries."""
libraries = ,
"seaborn": ,
"plotly": ,
}
library = params.library_name.lower()
if library in libraries:
return libraries[library]
return ' not found. Try: matplotlib, seaborn, or plotly"}
async def main():
# Step 2: Create and start the Copilot client with an explicit CLI path.
# The SDK needs to find the Copilot CLI, so specify the path explicitly.
client = CopilotClient()
print("🚀 GitHub Copilot SDK Demo - Agentic Coding in Action")
print("⏳ Starting Copilot client (this may take a moment)...\n")
await client.start()
print("=" * 60)
# Step 3: Create a session with custom configuration.
session = await client.create_session()
print(f"Session created: \n")
# Step 4: Set up event handlers for streaming.
def handle_event(event):
if event.type == SessionEventType.ASSISTANT_MESSAGE_DELTA:
# Stream the response as it arrives.
sys.stdout.write(event.data.delta_content)
sys.stdout.flush()
elif event.type == SessionEventType.TOOL_EXECUTION_START:
print(f"\n🔧 Tool called: ")
session.on(handle_event)
# Step 5: Send a prompt and let the agent work.
print("📝 User: List three common Python libraries for data visualization and their main use case.\n")
print("🤖 Assistant: ", end="")
await session.send_and_wait()
print("\n\n" + "=" * 60)
# Step 6: Clean up.
await session.destroy()
await client.stop()
print("✅ Session ended successfully!")
if __name__ == "__main__":
asyncio.run(main())
Code Explanation
First, we import everything we need, then define a custom tool with a Pydantic model for its parameters. The agent can call this tool to retrieve library information from local data. Next, we initialize and start the SDK client, which connects to the Copilot CLI.
We then create an agentic session with:
Model selection (gpt-4.1) Streaming enabled Custom tools registered System instructionsFrom there, we subscribe to real-time events to display streamed responses and tool calls. We send a prompt, and the agent autonomously decides to call our custom tool three times to gather information before responding.
Finally, we clean up by destroying the session and stopping the client gracefully.
Output:
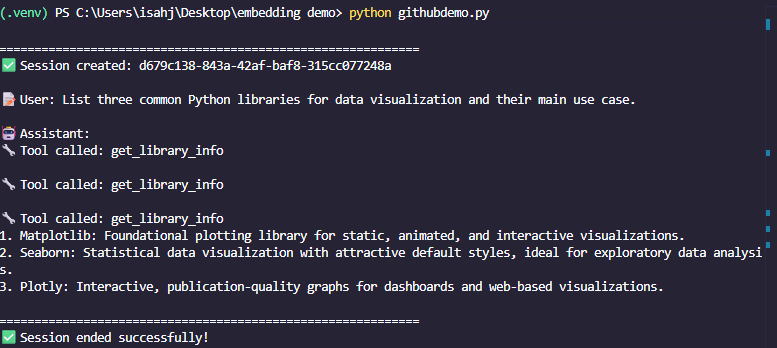
This simple example shows the core pattern of defining tools, starting a session, and running prompts. The SDK manages the complex orchestration, including autonomous tool selection and execution, letting you focus on building your application’s logic.
Building a More Capable Agent That Adds Tools and MemoryAn agent’s true power comes from using tools (like reading files or executing code) and maintaining context across multiple interactions. Let’s build a more advanced agent that can analyze a directory and remember our conversation.
Creating an Agent with File AccessThe example below demonstrates a more complex setup where the agent can use tools to interact with the file system, and we maintain a conversation thread for context.
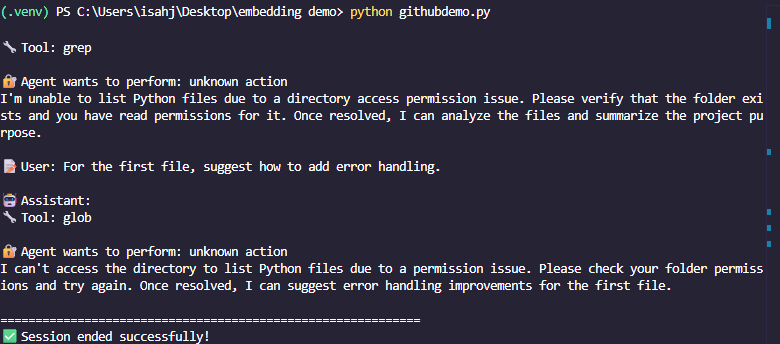
import asyncio import sys from copilot import CopilotClient from copilot.tools import define_tool from copilot.generated.session_events import SessionEventType from pydantic import BaseModel, Field # Permission request handler - uses the correct SDK types def on_permission_request(request, invocation): """Handle requests to use tools like reading files.""" print(f"\n Agent wants to perform: ") # Auto-approve for this demo, or add logic for user input. return async def main(): # 1. Create the Copilot client. client = CopilotClient() print("GitHub Copilot SDK Demo - Multi-Turn Conversation") print("Starting Copilot client...\n") await client.start() print("=" * 60) # 2. Create a session with permission handling enabled. session = await client.create_session() print(f"Session created: \n") # Event handler for streaming. def handle_event(event): if event.type == SessionEventType.ASSISTANT_MESSAGE_DELTA: sys.stdout.write(event.data.delta_content) sys.stdout.flush() elif event.type == SessionEventType.TOOL_EXECUTION_START: print(f"\n🔧 Tool: ") session.on(handle_event) # 3. First task: Summarize files in the current directory. print("User: List all Python files and summarize what this project does.\n") print("Assistant: ", end="") await session.send_and_wait() print("\n") # 4. Follow-up: The session remembers context (multi-turn conversation). print("User: For the first file, suggest how to add error handling.\n") print("Assistant: ", end="") await session.send_and_wait() print("\n\n" + "=" * 60) # 5. Clean up. await session.destroy() await client.stop() print("Session ended successfully!") if __name__ == "__main__": asyncio.run(main())
1
2
3
4
5
6
7
8
9
10
11
12
13
14
15
16
17
18
19
20
21
22
23
24
25
26
27
28
29
30
31
32
33
34
35
36
37
38
39
40
41
42
43
44
45
46
47
48
49
50
51
52
53
54
55
56
57
58
59
60
61
62
63
64
65
66
67
68
69
70
71
72
73
74
75
76
77
import asyncio
import sys
from copilot import CopilotClient
from copilot.tools import define_tool
from copilot.generated.session_events import SessionEventType
from pydantic import BaseModel, Field
# Permission request handler - uses the correct SDK types
def on_permission_request(request, invocation):
"""Handle requests to use tools like reading files."""
print(f"\n Agent wants to perform: ")
# Auto-approve for this demo, or add logic for user input.
return
async def main():
# 1. Create the Copilot client.
client = CopilotClient()
print("GitHub Copilot SDK Demo - Multi-Turn Conversation")
print("Starting Copilot client...\n")
await client.start()
print("=" * 60)
# 2. Create a session with permission handling enabled.
session = await client.create_session()
print(f"Session created: \n")
# Event handler for streaming.
def handle_event(event):
if event.type == SessionEventType.ASSISTANT_MESSAGE_DELTA:
sys.stdout.write(event.data.delta_content)
sys.stdout.flush()
elif event.type == SessionEventType.TOOL_EXECUTION_START:
print(f"\n🔧 Tool: ")
session.on(handle_event)
# 3. First task: Summarize files in the current directory.
print("User: List all Python files and summarize what this project does.\n")
print("Assistant: ", end="")
await session.send_and_wait()
print("\n")
# 4. Follow-up: The session remembers context (multi-turn conversation).
print("User: For the first file, suggest how to add error handling.\n")
print("Assistant: ", end="")
await session.send_and_wait()
print("\n\n" + "=" * 60)
# 5. Clean up.
await session.destroy()
await client.stop()
print("Session ended successfully!")
if __name__ == "__main__":
asyncio.run(main())
In this code, the on_permission_request function allows the agent to safely request access to perform actions like reading your file system. The session is important because it keeps the conversation history, so your second question can refer to “the first file you mentioned” without confusion.
Output:
The following are key concepts and best practices you must have in mind. Building a demo is the first step. To create robust applications, keep these principles in mind:
You must define clear instructions. Your agent’s instructions parameter is its job description. Be specific about its role, limitations, and output format. Use tools strategically: Start by enabling the SDK’s built-in tools (file, shell, Git) for powerful prototypes. Later, build custom tools (like querying a database) for specialized tasks. Manage permissions: Always implement a permission handler (as shown above). Never run agents with unrestricted access in production. Handle errors gracefully: AI agents can make mistakes. Build validation steps to check their work, especially for file operations or code generation. ConclusionThe GitHub Copilot SDK democratizes agentic AI, allowing you to integrate sophisticated, goal-oriented assistants into your Python applications without building complex orchestration logic from scratch.
You’ve seen how a few lines of code can create an assistant that understands context, uses tools, and completes multi-step tasks. The potential applications are vast: automated data pipelines, intelligent code reviewers, personalized CLI tools, or interactive documentation bots.
To move forward:
Visit the official github/copilot-sdk repository for the latest documentation, detailed guides, and more examples in Python and other languages. Experiment by giving your agent a real, small task from your workflow. Explore integrating custom tools and MCP servers to connect your agent to external data and APIs.Begin your journey into agentic development today. Install the SDK, build a small project, and discover how to offload complex, reasoning-based tasks to your new AI-powered assistant.
Learn More
Comments (0)