
Remember me


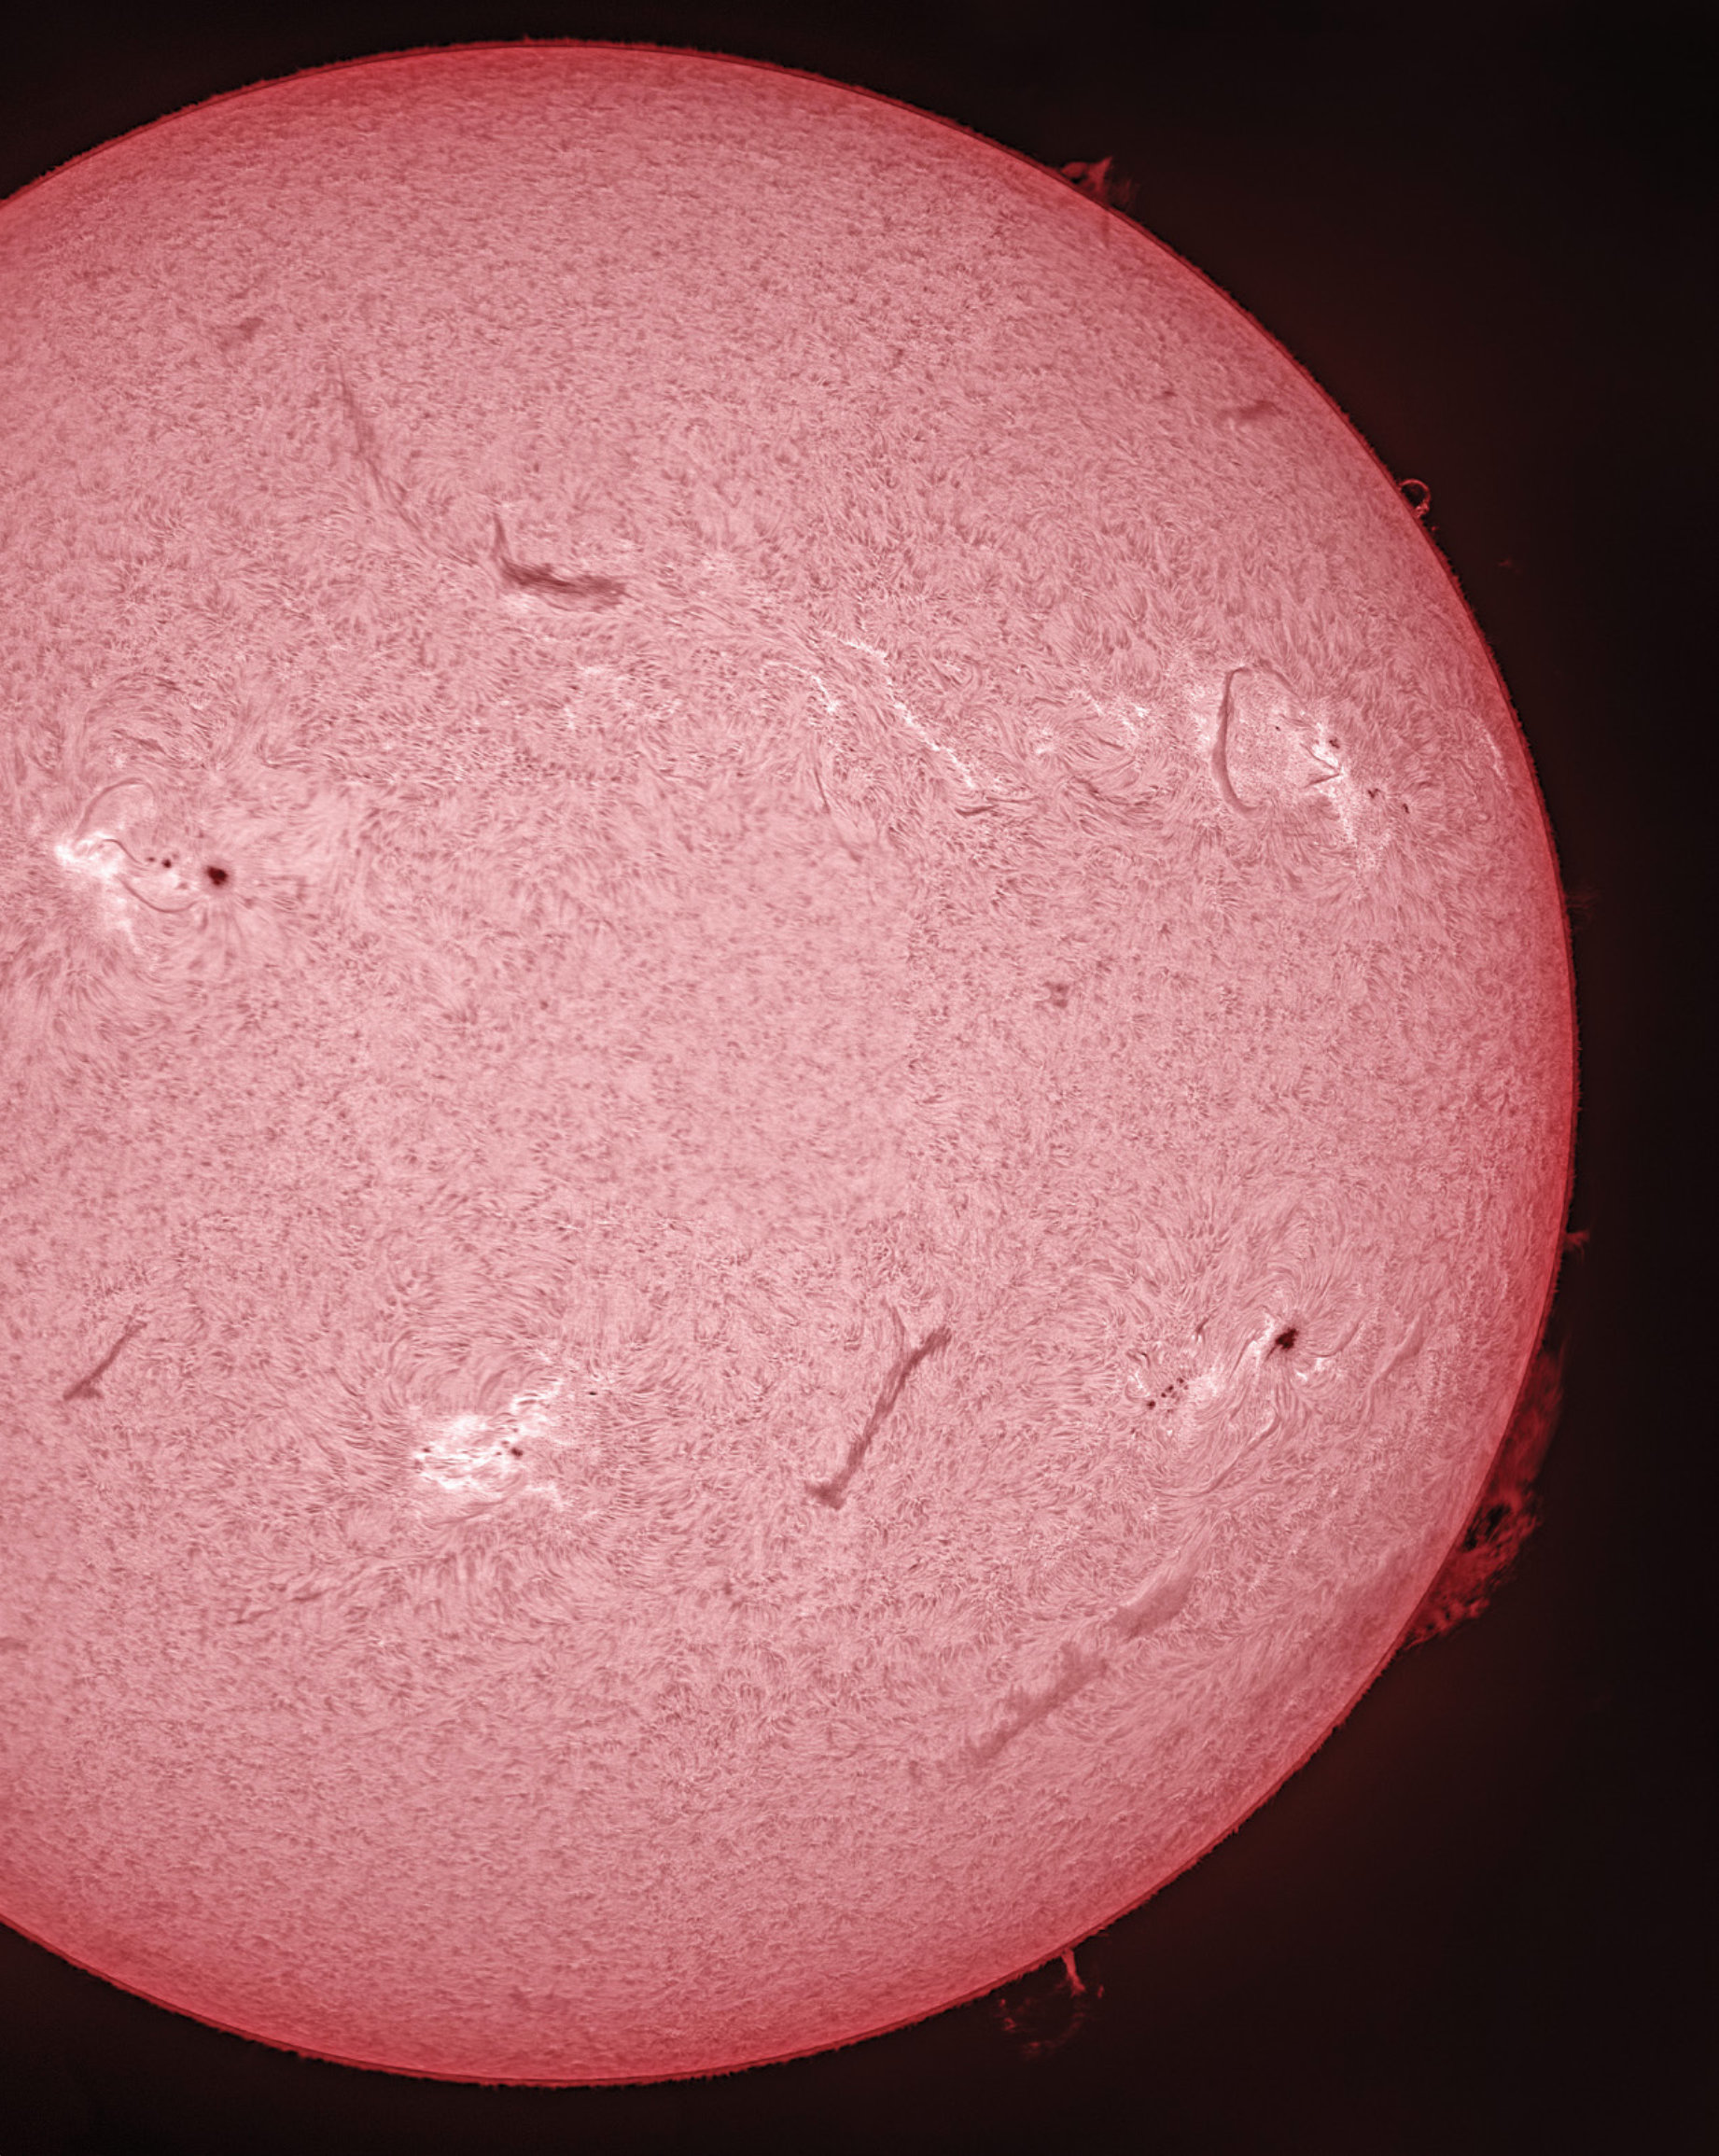
 HEATING UP Solar Cycle 25 is roaring to life, making this a great time to experience the excitement of solar imaging. This mosaic of the Sun was captured by the author on July 15, 2022, with an Astro-Physics 92mm Stowaway refractor equipped with a Daystar Quark Chromosphere solar filter. Sixteen, 15-second videos were recorded using the Player One Mars-M video camera reviewed in the February issue. The results were stacked in Autostakkert!3, then assembled in Adobe Photoshop.
As the nearest star, the Sun is the most dynamic object you can observe in the sky. A nearly perfect sphere of incandescent plasma, it’s loaded with fascinating details that change by the minute. And at long last, solar activity is on the rise. Solar Cycle 25 is already on track to produce lots of active regions, sunspots, and flares. Here’s how you can get in on the imaging action.
Areas of InterestThe Sun is close enough to reveal its churning atmosphere in a properly equipped telescope of any size. By happy coincidence, it appears around a half degree in diameter — the same apparent size as the Moon. This is one reason we get total solar eclipses, which allow for brief, unfiltered views of the Sun’s outer atmosphere, the corona (S&T: Mar. 2020, p. 30). The rest of the time, pointing any optic at the Sun requires the use of a safe solar filter in order to reduce its intense brightness to a safe level.
With the appropriate solar filter, the Sun is observable in many wavelengths, though Earth’s atmosphere blocks some of the more interesting ones (particularly at ultraviolent wavelengths).
Besides the corona, two additional layers of the solar atmosphere are of interest to amateurs: the photosphere and the chromosphere. The photosphere is made up of bright granules of plasma that rise and sink over the course of about 10 minutes and is the deepest layer of the Sun that we can directly observe. Additionally, dark sunspots appear in the photosphere, where magnetic fields break through the sur- face. The photosphere is visible through simple “white-light” solar filters and until fairly recently was the primary region that amateurs could view.
The other visible layer of the solar atmosphere is the chromosphere, residing about 3,000 to 5,000 kilometers above the photosphere. Meaning sphere of color, the chromosphere is arguably the most dynamic layer. It comprises primarily reddish, low-density plasma visible along the solar limb during total eclipses. The chromosphere is where much of the excitement happens on the Sun: Gigantic prominences shim- mer along the limb, dark filaments snake across the disk, and coronal loops, plage, and occasional bright flares come and go on timescales that can last from minutes to weeks.
Although the chromosphere is briefly visible during a total eclipse, it’s best seen through a specialized filter that only passes a narrow region of the spectrum where this activity is visible. The most popular are hydrogen-alpha (Hα) filters, which pass less than one angstrom of light at 656.28 nanometers and reject everything else. These filters are much more complex (and therefore more expensive) than white-light filters and are not the same as deep-sky filters used to image the night sky. The hydrogen-alpha wavelength reveals an amazing show unlike any other in the sky.
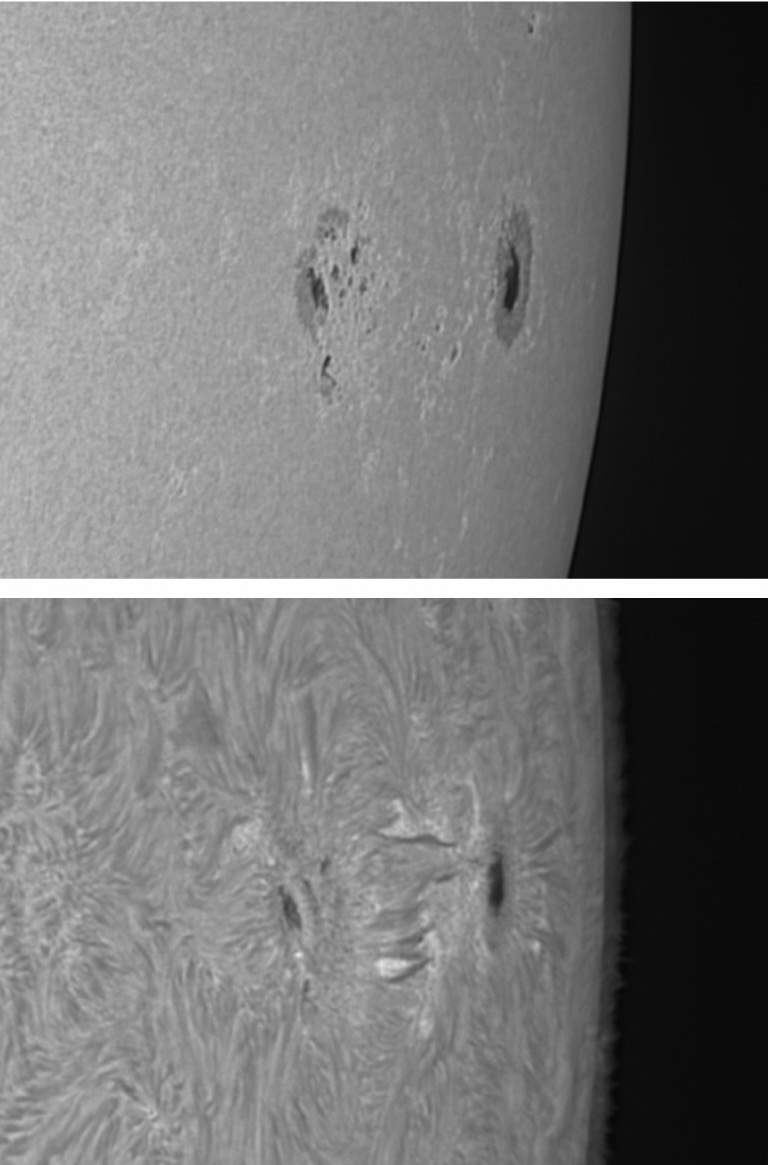 ATMOSPHERIC LAYERS Top: Sunspot group AR 3038 appears surrounded by small areas of bright plage when recorded in white light. Bottom: The same group shows spicules and small filaments in the chromosphere when imaged through a Daystar Quark Chromosphere filter.
The chromosphere is also visible in a bluer region of the spectrum centered at 393.4 nm where calcium is ionized in the solar atmosphere, known as the calcium-K line (Ca-K). Such filters display a violet image of the Sun similar to, but higher contrast than, the white-light view showing sunspots, granulation, supergranulation, faculae, and extended plage regions where strong magnetic fields are present. Prominences are also visible through a Ca-K filter, though they appear much fainter than in Hα. Because the Ca-K line is at the violet end of the visible spectrum, older observers often have a hard time seeing through these filters, and in general they’re better suited to imaging rather than visual use. Manufacturers including Baader Planetarium (baaderplanetarium.com), Daystar Filters (daystarfilters.com), Lunt Solar Systems (luntsolarsystems.com), Meade (meade.com), and Solarscope (solarscope.co.uk) all offer filter systems you can connect to your own telescope, as well as several dedicated solar telescopes with built-in Hα or Ca-K filters. Regardless of the wavelengths you choose, the process of creating images through them is identical.
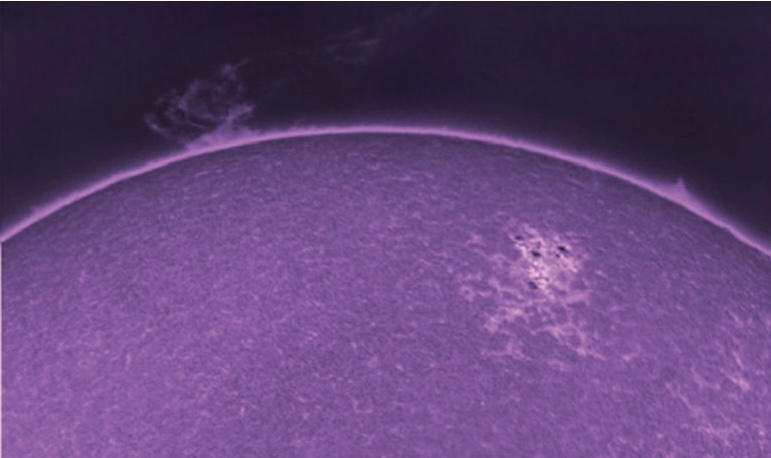 VIOLET PROMINENCE A calcium-K filter highlights magnetic fields and supergranulation in the chromosphere. Prominences can also be captured through this filter, as this colorized result shows.
There are several things you need for solar imaging besides your telescope, filter, and camera. Because you’ll be out under the blazing Sun, don’t forget to apply sunscreen to avoid sunburn while at the telescope. In addition, any computer you bring out to operate your camera and equipment will need some means of shading it so that you can see its screen in order to focus and monitor your progress. A folding table with a large cardboard box works well and is preferable to the clip-on screens I’ve seen online. A box will keep your entire computer out of the Sun and reduce the chances of it over-heating. Adding a towel also helps so that you can block the sky from reflecting off the computer screen.
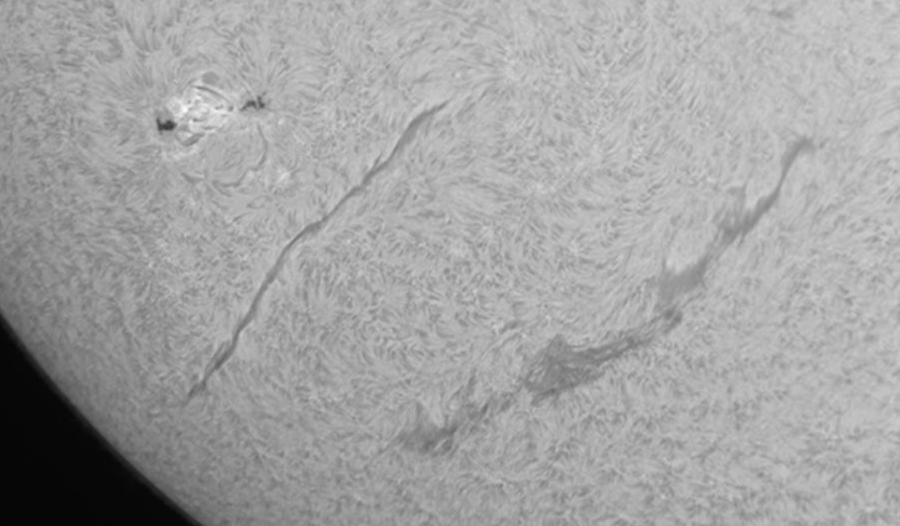 SNAKING PLASMA Huge filaments, which are simply prominences seen against the solar sphere, can dance for hours, days, and even weeks before suddenly lifting off into space.
The next piece of equipment to consider is your camera. You can shoot the filtered Sun with any camera, but the quality of your images may vary depending on your choice. For instance, the view through any solar filter, be it white- light, Hα, or Ca-K, is essentially monochrome, so shooting with a color camera such as a DSLR or Mirrorless camera, while doable, isn’t quite as easy as when using a monochrome camera designed to fit in a telescope focuser. But if that’s what you have to work with, be sure to record many frames to stack and sharpen later.
Imaging our star with a camera having a large sensor with tons of small pixels has a few benefits. First, it’s easy to fit the entire Sun on the detector with enough resolution to show all the interesting features visible. In some cases, you don’t even need to use a tracking mount — you can simply record images as the Sun drifts across the detector and stack the results later. For example, I often record white-light images using a small refractor with a focal length of 600 millimeters and a Nikon APS-C format DSLR. It’s easy to snap several dozen exposures on a sturdy tripod before the Sun drifts too much.
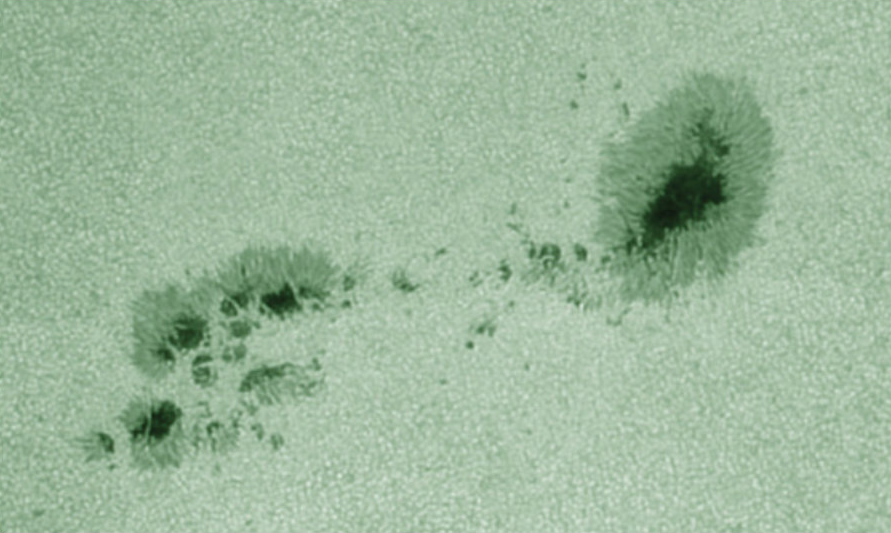 CHURNING CAULDRON Solar granulation, the small light-and-dark cells that make up the photosphere, are best seen under the steady seeing conditions often found in the morning hours. This closeup of AR 3055 was recorded through a 102-mm achromat equipped with a Baader Herschel Wedge and solar continuum filter centered at 540 nanometers (in the green region of the spectrum).
With smaller detectors, it’s desirable (but still not entirely necessary) to track the Sun while imaging. However, your best results will come when using a tracking mount, since it allows you to use high magnification and focus your efforts on smaller features.
I prefer to shoot the Sun with a high-speed monochrome video camera because it offers the best signal at any wavelength and allows you to record at extremely fast frame rates, which is important because daytime seeing is often poorer than at night. This is why it’s best to image in the morning hours, before buildings, trees, or other objects in your vicinity begin to radiate heat.
Capture StrategyOnce you’re set up and ready to image, there are a few things to consider before firing off your shots. First, choose a small, high-contrast feature to use as a focus target. It’s relatively easy to focus on sunspots in white light, or small filaments in active regions when shooting through Ca-K and Hα filters. Take your time to ensure you’ve really nailed focus and recheck frequently. Remember, your scope is in direct sunlight and is heating up, which means parts expand and focus changes. I’ve seen the focus shift in as little as 5 minutes while shooting a full-disk mosaic, making last images notably softer than the first ones.
Next, establish your exposure level. You don’t want to overexpose the brighter areas of the solar disk, but you do want to keep noise levels as low as possible. The Sun is the brightest thing in the sky, so you don’t need to record it with high ISO or high-gain settings. Keep the gain low and increase the image brightness using the exposure control. A good trick I use is to place the center of the Sun in the middle of the camera’s field and set the exposure so that the maximum value on the capture program’s histogram is about 90% of maximum. (Most DSLR and Mirrorless cameras allow you to check the histogram of an exposure after it’s taken.) That way, the only time anything becomes overexposed is when a flare unexpectedly occurs, typically in Hα.
 PEAK EXPOSURE To record detail on the solar disk, monitor the histogram in your capture program (such as Firecapture seen at right) and make sure its peak value is roughly 90%.
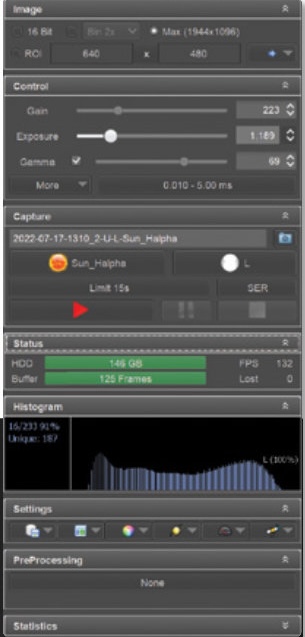
Now you’re ready to record. Remember that even in white light, solar features can change appearance quickly. Granules brighten as they rise to the surface, then darken and sink back into the photosphere within about 5 minutes. And with thousands of them appearing in each shot, two images taken less than a minute apart will show “scintillation” of these dark and light granules. Combining still images taken within 30 seconds or so should produce a fine image. I usually record videos lasting between 15 and 30 seconds, depending on the frame rate of the camera. Experiment with these settings to find a combination that works best for your particular setup.
If you’re shooting a high-resolution mosaic of the solar disk, you may need to record flat-field calibration frames in order to eliminate sensor dust specks appearing in your images, or to compensate for uneven transmission across the field of view in your filter system. Flat-field calibrated images stitch together effortlessly.
Shooting solar flats can be tricky. I usually get away with skipping them in full-disk images by ensuring my detector is clean and free of dust. Smaller fields, however, require more attention. Daystar Filters sells a device called a Flat-Cap that diffuses the sunlight coming through your telescope to produce a good flat-field image. I’ve also found that significantly defocusing the telescope while pointed at a relatively blank area near the middle of the solar disk works well, too. I set the camera’s exposure so the histogram is peaking at about 50% and record a short 300-frame video that I later stack and save in AutoStakkert!3. I also shoot a new flat if I rotate the camera during a session.
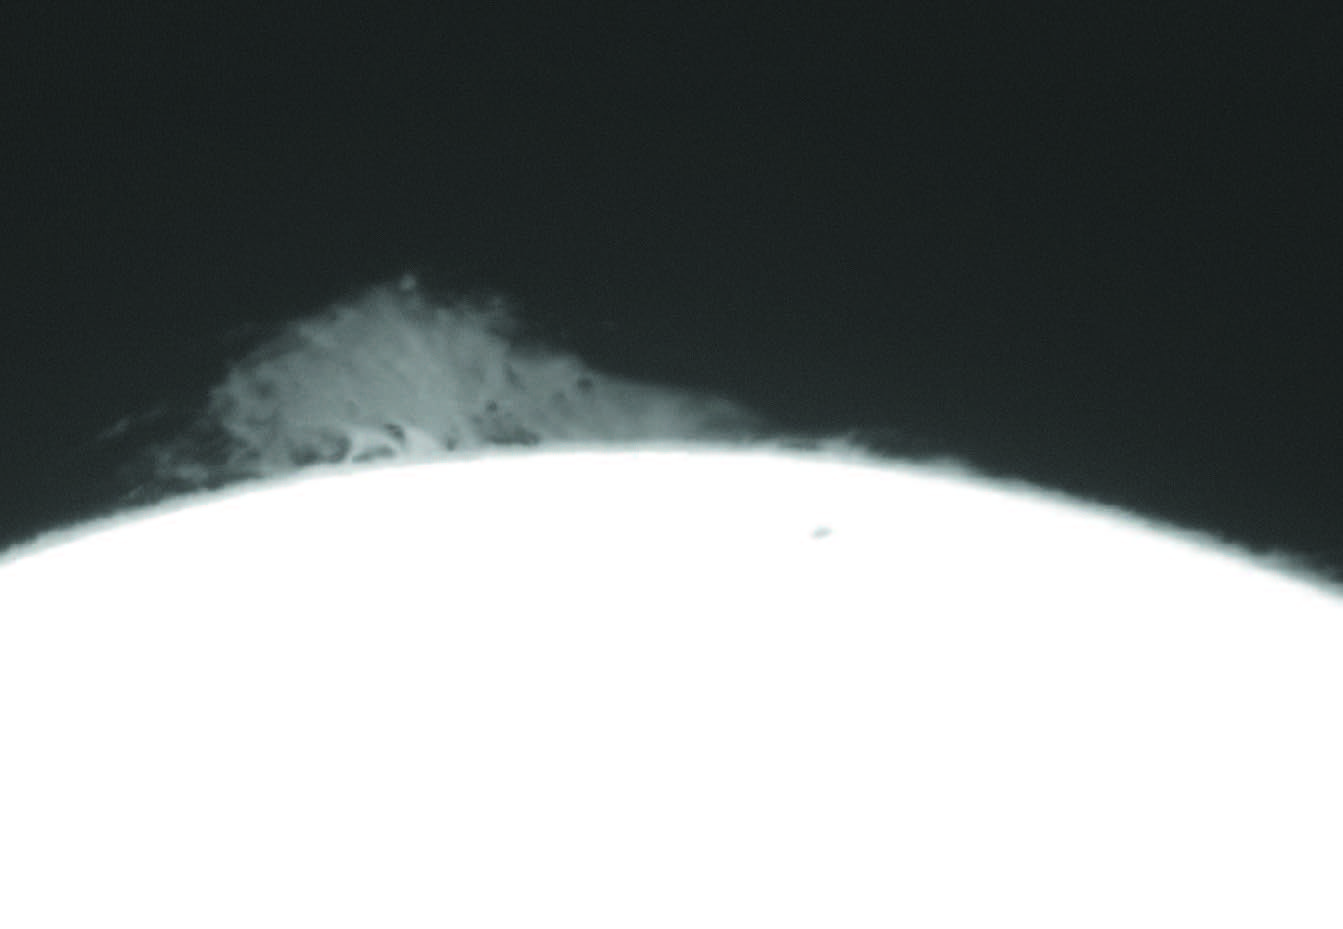 LOW GAIN Increase your exposure length, rather than the gain setting, in order to record very faint prominences along the solar limb at the expense of disk detail. This produces a smooth, bright image of the prominence that stacking software can easily lock on to.
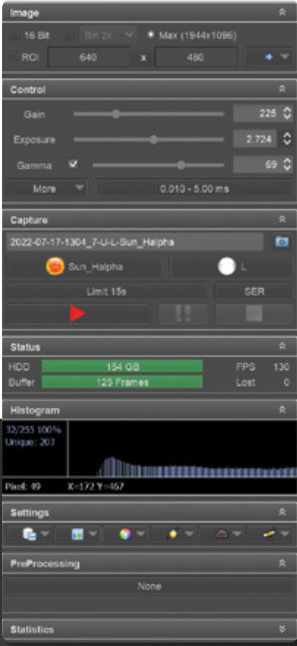
Finally, plan your coverage strategy when shooting solar mosaics. It’s no fun putting together a full-disk mosaic only to discover you missed an area! I tend to align my camera square to the RA and declination so that I can systematically sweep across the entire solar disk quickly.
Stacking and SharpeningOnce you have all your images recorded, sharpening solar images is easy — any program with sharpening tools can improve your pictures. Stacking the results requires one of several programs, such as AutoStakkert!3 (autostakkert.com) or RegiStax 6 (astronomie.be/registax) for PC computers, or PlanetarySystemStacker (https://is.gd/planetaryss) for Macintosh users. I actually employ three programs when processing my images. First, I stack all my still frames or videos using Autostakkert!3, then sharpen them with wavelets in RegiStax 6, and finally stitch together any mosaics and colorize the result with Photoshop CS.
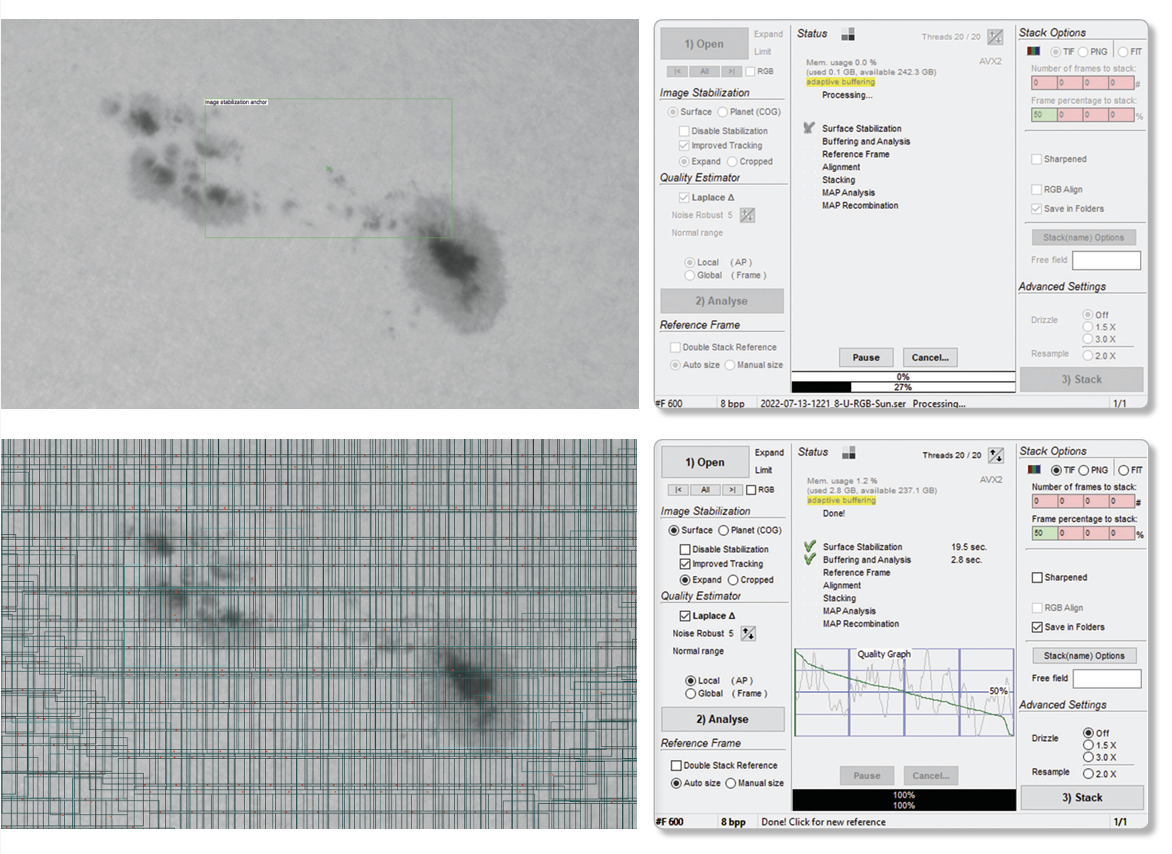 EASY STACKING Top: Autostakkert!3 makes it simple to stack dozens of solar videos. First, select a small, high-contrast spot to estimate the quality of the individual frames and click Analyse. Bottom: Once the step is complete, clicking Place AP grid automatically generates hundreds of alignment points to track and stack. Enter the number of frames to stack, and click 3) Stack then the program will set off stacking all your videos one at a time.
Stacking in Autostakkert!3 is easy. The program handles still image formats such as TIF, FIT, JPG, or PNG, and takes AVI, MPG, or SER videos. If you’ve shot a flat-field calibration video, open that first and select Image Calibration > Create Master Frame. In a moment, the video is stacked into a smooth calibration frame that you then save. Next, choose Image Calibration > Load Master Flat, select your flat-field frame, and that calibration image will be applied to all your videos. Select all the images you’d like to stack and drop them into the open program window. In the command window, choose Surface in the Image Stabilization section and hold the Ctrl button while clicking a contrasty feature to track on, such as a sunspot. Next, click the 2) Analyse button, and the program quickly evaluates all the frames and
reorders them so that the best frames are first.
When that step is done, select the alignment point size (I start with 104) and check the Multi-Scale option at the bottom left of the screen. Now click Place AP grid, and the program will quickly select hundreds of alignment points. Before commencing the stack operation, go to the right side of the control window and select the file format you’d like the final stacked image to be saved as (TIF, PNF, or FIT), then enter the number or percentage of frames to stack. You can do both, and up to four values of each option, which is helpful if you imaged in shaky seeing. Check the Save in Folders option, then hit the 3) Stack button, and the program will assemble your stacked result.
AutoStakkert!3 will batch process many videos, so you don’t have to do each one individually. But if you’re stacking still frames, you need to concentrate on one group of images at a time.
Once the stacks are completed, I take the results one at a time into RegiStax 6 and apply mild wavelets. RegiStax 6 also performs multipoint registration just as well as AutoStakkert!3 but is more time-consuming because it can only work on one video or image group at a time, and because the program runs far slower than AutoStakkert!3.
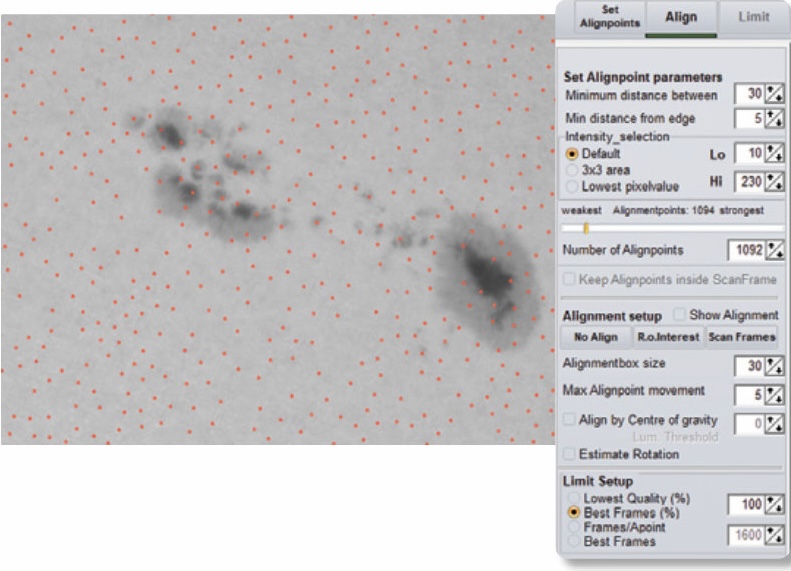 OLD STANDBY RegiStax 6 permits users to align multiple points across a solar image, seen as hundreds of tiny red circles.
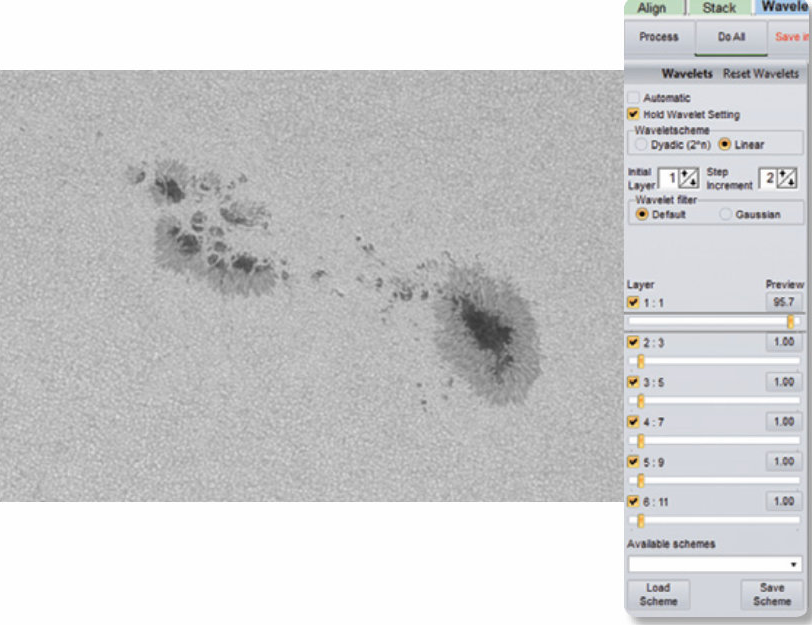 MULTI-LEVEL SHARPENING Stacked images produced with Autostakkert! 3 or RegiStax 6 are best sharpened with Wavelets in the latter program.
Simply open the program and drag and drop a stacked image into it. In a moment, RegiStax 6 proceeds to the sharpening window, with six wavelet sliders displayed along the left side of the screen. Solar images don’t require very much sharpening, so I tend to only move the top two sliders until I’m satisfied with the result and then click Save image. Be sure to retitle the result so it doesn’t overwrite the raw stacked file.
Quick MosaicsAt this point, I open the sharpened results in Adobe Photoshop to colorize the result and share it with my friends. If I’ve recorded a set of images for a mosaic of the solar disk, Photoshop makes it easy to quickly assemble the pieces. Simply open all your sharpened images, then select File > Automate > Photomerge from the pulldown menu. The Photomerge window opens, where you should click the Add Open Files button, and click OK. In a few moments, your assembled mosaic appears on the screen. Voila!
All that’s left to do is colorize the result using Image > Adjustment > Color Balance. You might also want to boost the brightness of any prominences along the limb in your Hα or Ca-K pictures; I find the Shadows/Highlights tool does a fine job (Image > Adjustments > Shadows/Highlights). Some imagers also invert the disk image using Image > Adjustment > Invert, then layer that image with a positive image of the prominences, in order to make plage and active regions more apparent. It’s all up to you at this point.
With the right equipment, solar imaging is easy and enjoyable. You can also make time-lapse videos of flares, prominences, and other rapid changes on the Sun happening every day. And the best part is you won’t lose any sleep while solar imaging — it all occurs while the Sun is up!
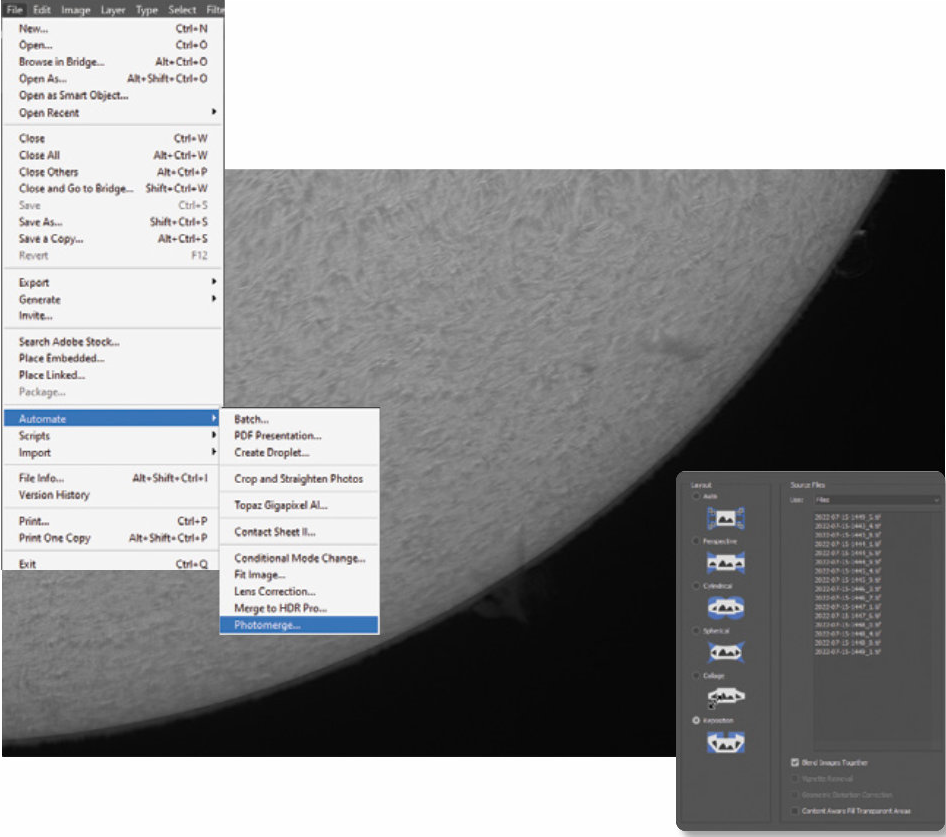 AUTOSTITCH Assembling large, full-disk mosaics is a snap with Adobe Photoshop CS. Simply open all your sharpened panels and select File > Automate > Photomerge. Add all the open files, then click OK. In a minute or two, your assembled mosaic will appear similar to the result seen below.
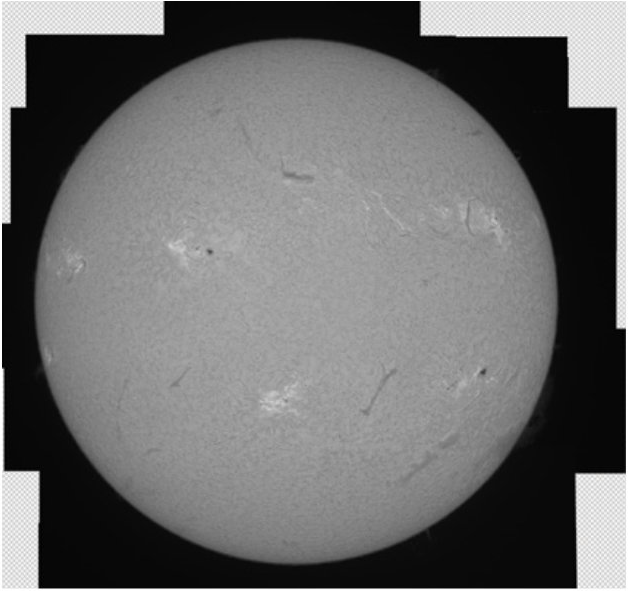 Sean Walker
This article originally appeared in the November 2022 issue of Sky & Telescope.
Comments (0)