
Remember me


 DIFFERENT STROKES Jerry and Kathy Oltion (left and top) work on their mirror blanks using hydrostone tools. Colin Miller (right) hogs out his mirror using a ring tool.
 I often tell people that making your own telescope mirror is easy: You just put two round pieces of glass together with grit in between them and push the top one back and forth over the bottom one about a million times, and voila, you’re done.
That turns out to be not entirely accurate.
The actual number of strokes is a lot fewer, probably only 300,000 for a typical mirror. And I left out a few steps.
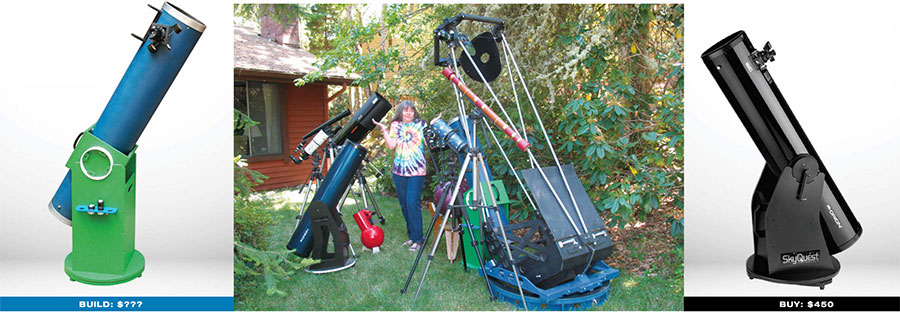
In my article on whether it was cheaper to buy or to build a telescope (S&T: Nov. 2021, p. 66), I discussed mirror making as part of the process, but if you decide to actually do it, how do you proceed? Let’s get into the nitty-gritty — literally.
Here’s the short version: You really do put the soon-to-be mirror (called a blank) on top of the grinding tool and push it back and forth a lot. Whatever is on top slowly becomes concave, and whatever is on the bottom becomes convex. Once you dig it as deep as you want, you use finer and finer grits to undo the damage you did with the coarse grit, then switch to a polishing tool and continue pushing it back and forth until you’ve got a smooth surface again. Then you change your polishing technique to shape the surface into a parabola, coat the mirror with aluminum or silver, and put it in a telescope.
Now let’s take a closer look at each of those steps.
Rough GrindingFirst off, how does pushing one piece of glass over another one make the top piece concave and the bottom one convex? Look at the illustration at the top-right. When the top piece is directly over the bottom piece, the grinding action is uniform across the entire surface, but when you push the top piece off-center, the action reduces to an ever-narrowing, football shaped area of contact. Because the grit has less area to work on, but the weight pushing the two pieces together is more or less constant, the pressure per unit of area increases dramatically as the two pieces slide more and more off-center.
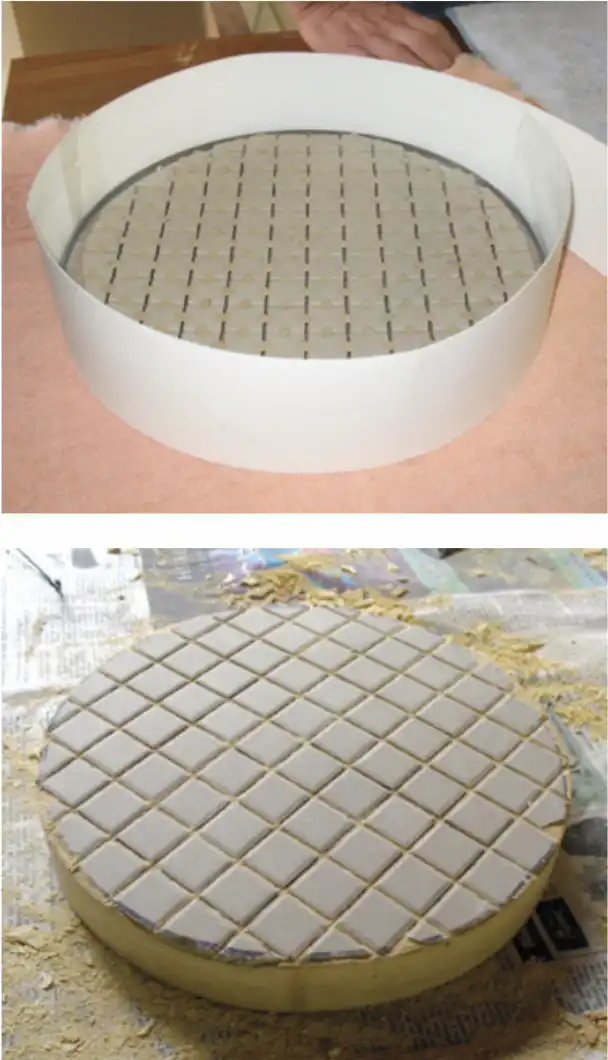 HOMEMADE TOOLS Top: To make a tile tool, lay a tile mat on top of plastic wrap over the mirror blank, add a dam of paper or tape around the edge, and pour waterproof plaster (hydrostone or similar) over it. Bottom: When the hydrostone has set enough to remove but is still soft, separate the tool from the mirror, dig out the channels between the tiles, and you’re ready to start.
Because you’re pushing down evenly on the top piece, most of that extra pressure is directed toward the center of the top piece and toward the edge of the bottom piece. That means the center of the top piece wears faster than its edge, and the edge of the bottom piece wears faster than its center. You rotate the mirror and the tool in opposite directions every few strokes in order to keep the mirror’s curve symmetrical. (Grinding with mirror and tool in the same orientation creates a saddle shape — not what you want!) If there’s room, progressively walk around the mirror as you work it. A 55-gallon drum full of water makes a great workstation, which led to the term “once around the barrel” to refer to a complete revolution of tool and mirror with respect to each other.
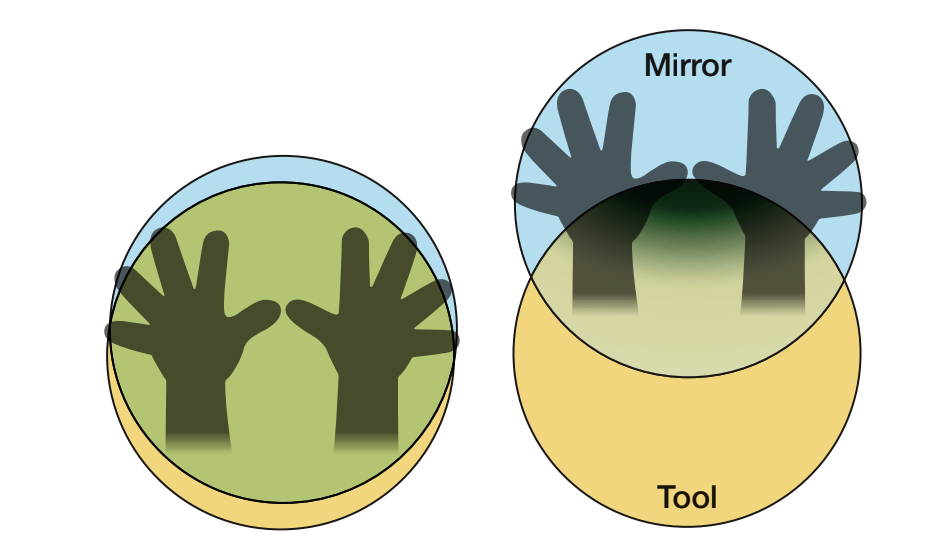 HOGGING OUT When the mirror is centered over the tool (left), abrasion is even across the entire surface. When the center of the mirror is over the edge of the tool (right), gravity and the pressure of your hand cause more wear on the center of the mirror and the edge of the tool.
 The illustration above is a bit exaggerated; the actual stroke you use only moves the mirror 1/6 of its diameter off-center in either direction, for a total stroke length of 1/3 the diameter. This is called the “One-third center-over-center stroke,” and you’ll become very, very familiar with it by the time you’re done.
This first phase is known as the rough grinding or “hogging out” stage of mirror making. You can simply use another blank as your tool, but nowadays most mirror makers use a tool made of ceramic tile rather than a second piece of glass for the bottom piece. Either way, the method is the same.
Tile tools are simple to make: Take a mat of one-inch bathtub tile and cut it into a circle the size of your mirror. (You can either cut the tiles with a tile saw, bust them with pliers, or even simply cut away any tiles that stick out over the edge of the mirror.) Next, place the tool face-down on a sheet of plastic wrap over the mirror, add a dam of tape around the edge of the mirror, and pour an inch or so of liquid hydrostone or dental stone (waterproof types of plaster) over the tile mat. Let it harden, dig out the channels between the tiles, and there’s your tile tool.
Hogging out can also be done with a small, round metal tool on top of the mirror, often referred to as a ring tool. By crossing the ring tool over the center of the blank with each stroke, the tool spends more time in the center of the mirror than on any given point on its edge, so the center wears faster than the edge. An iron pipe flange works really well as a ring tool.
How do you know when to stop hogging out? You decide ahead of time what focal length you want your finished mirror to be, and you calculate the depth of the required curve (called the sagitta) with the following formula:
Sagitta = diameter/(16 × focal ratio)
So, if you’re making a 10-inch f/5 mirror, your sagitta is 10/(16 × 5) = 0.125 inch.
Seriously: You don’t have to make a cereal bowl; an eighth of an inch of depth in the very center, tapering off to nothing
at the edges, is all you need.
On the other hand, a little more complicated math reveals that doing so removes almost five cubic inches of glass from the blank. And you’re doing that one microscopic chip at a time. No wonder rough grinding takes several hours!
Fine GrindingHogging out is usually done with 80-grit carborundum (silicon carbide) abrasive. When the pieces of grit tumble around between the mirror blank and the tool, they gouge out little bits of glass. You do this in a water slurry so the grit can move around freely, and to minimize airborne glass dust. (You really don’t want to breathe glass dust.) The grit particles quickly wear down, though — within just a few minutes — so they need to be replaced. Each replacement of the grit is called a wet.
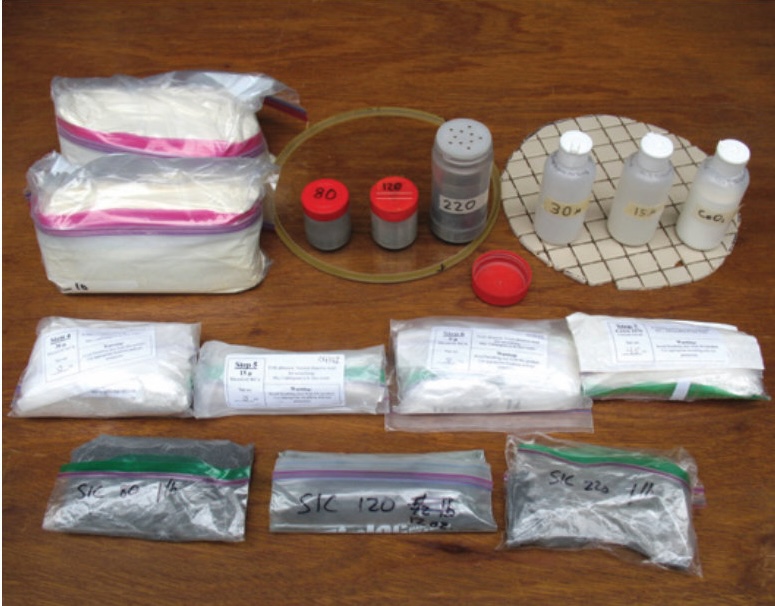 ONE-STOP PURCHASE Several online retailers offer mirror-grinding kits. These packages come with all the grits you need, plus the tile mat and the hydrostone to make the grinding and polishing tools. Not shown here but included in a complete kit: a can of pitch.
Most telescope makers don’t actually grind all the way to their target sagitta with 80 grit. Such coarse grit leaves big pits in the glass, so you should stop a little short, say 80% to 90% of the way, and switch to 120 grit. (If you hogged out with a ring tool, you’ll need to make a tile tool at this stage.) Grind for a couple of hours with that until you don’t see any of the 80-grit pits anymore, then switch to 220, and on to finer and finer grits. With the medium grits, you can finetune the focal length by flipping the mirror and tool over and grinding with the tool on top. That will undo some of the sagitta, flattening the curve if you went a little too far with the coarse grits. The amount of correction you can make becomes less and less with each successive grit, so you want to be close to your final sagitta by the time you finish 220 or so.
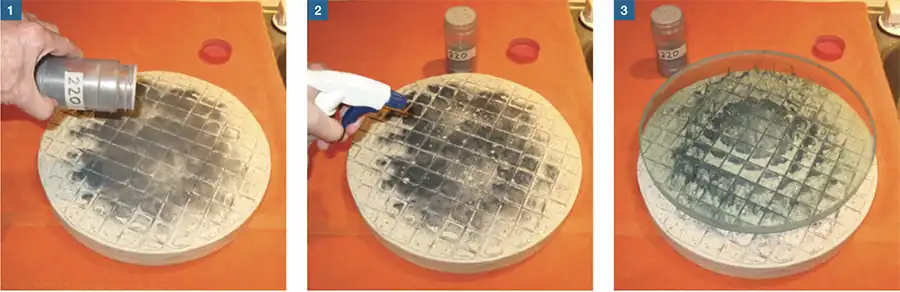 WETTING THE TOOL The process of spreading grit and working the blank is called a wet. 1: Spreading grit on the tool is convenient using a repurposed spice shaker — it doesn’t take much for a single wet. 2: A spray bottle filled with water allows you to get the grit good and wet without washing it away. 3: The back-and-forth motion helps the grit dig into the glass, removing it one tiny chip at a time.
In the old days, mirror makers used carborundum all the way up to the end, but nowadays we switch to aluminum oxide after 220. The size of the particles is measured differently, so you move on to 25-micron, then 15-micron, and then 9-micron aluminum oxide. (Some people proceed all the way to 5-micron, but that’s not necessary.) Alox, as it’s sometimes called, is a gentler abrasive. The particles are more plate-shaped, shearing off high spots rather than gouging out pits. It gets you to the final stages of smoothness a lot faster than carborundum will.
Polishing the MirrorWhen you get to 9-micron grit, the mirror floats back and forth across the tool with just a whisper of resistance from the abrasive. The surface looks smooth even under a magnifying glass. But the glass still appears frosted, and in terms of wavelengths of light, the surface is still a cratered disaster. It needs to be polished to crystal clarity before it can be used in a telescope.
That step is done with a pitch tool. Right: pitch, as in boiled tree sap. There’s also synthetic pitch (called AccuLap), which has essentially the same characteristics as the natural stuff. We either pour a quarter-inch or so of it over the grinding tool, or we make a new hydrostone disk to pour it on (the preferred method in case you need to go back to the grinding tool later to remove a scratch).
The pitch tool is used with a very fine abrasive, cerium oxide, that embeds itself in the pitch and both wears away and pushes around glass molecules to smooth the surface. Channels cut or molded into the pitch lap let the polishing compound (a mixture of cerium oxide and water) sluice around during polishing.
 WEAR AND TEAR Silicon carbide grit starts out sharp and pointy (above) but quickly wears down into rounded particles (below).
At the end of the polishing stage, you’ll have a nearly perfect section of a sphere with a radius of curvature (the distance from a curved surface to its imaginary center point) that’s twice the focal length of the mirror. Why a sphere? Because that’s the only geometrical figure that allows you to slide one surface over another without high and low spots interfering with one another. If anything sticks out, it quickly gets worn down. So, as you do the fine grinding and polishing, you’re wearing down all the high spots until your mirror is nearly perfectly spherical.
When I say “nearly perfect,” I really mean it. If you’re careful with your technique, you’ll be within a tenth of a wavelength of light or so of perfection. All done by hand with tools and techniques that have changed very little in 350 years.
Alas, a spherical surface makes a poor telescope mirror. Incoming light that hits the outer part of the mirror focuses much closer to the surface than light that hits near the center. The focal point is smeared out into a focal line. In order to bring all the incoming light to a focus at the same place, the surface has to be changed from a spherical section to a
paraboloid.
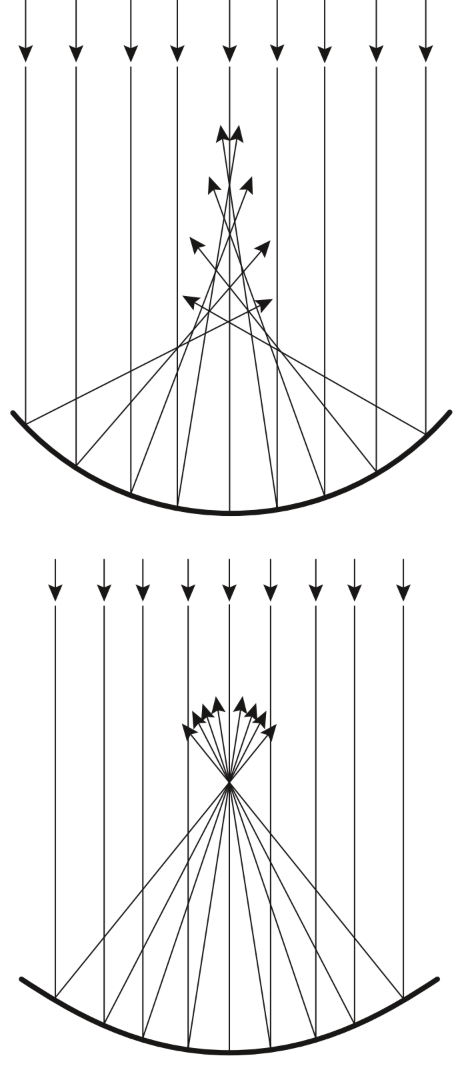 FOCUSING POINTS Top: A spherical surface is easy to make, but it doesn’t focus starlight to a point. Below: The mirror must be parabolized in order to provide crisp focus.
 The problem is, the geometry of pushing one disk back and forth over another doesn’t make paraboloids. Well, okay, it sort of does, because that’s how we do it, but at this stage we’re not making the paraboloid as the inevitable result of geometry anymore. We’re altering our back-and-forth strokes to emphasize pressure on different parts of the mirror’s surface, either increasing the focal length of the outer zones, decreasing the focal length of the center, or both. There’s no happy equilibrium that will maintain a parabola indefinitely; you sneak up on it, and if you don’t stop with the altered strokes at just the right moment, you go right on past a paraboloid and create a hyperboloid. And then all sorts of other shapes as everything turns into what we fondly call “a hot mess.”
So we need to examine the surface profile while we parabolize so we don’t overshoot our goal. The Foucault test used to be pretty much the only test a mirror maker would use. It’s very accurate and has produced many excellent mirrors, but it’s a fussy, math-intensive test that’s really best for the final stages of parabolizing, not in the early stages when you just want to know if you’re in the ballpark yet.
Fortunately, there’s a great ballpark test method called the Ronchi test that has come into greater use over time. Its advantage is that the tester is easy to build (S&T: Aug. 2021, p. 74), easy to set up, and easy to interpret. In the Ronchi test, a spherical mirror will show a series of straight bars of light and dark, and the more parabolized the mirror becomes, the more those bars curve. You can use a computer program to generate the ideal curves for the parabola you want (Mel Bartels has an excellent tool that does so at https://is.gd/ronchi), and you can compare what you see against the generated pattern and keep tweaking your parabola until the patterns match.
With either the Foucault or the Ronchi test, you still finish out your mirror by examining what it does to actual star- light (called, appropriately enough, the star test). Nowadays, many mirror makers skip the Foucault test entirely and just go straight from Ronchi to star testing. Once the mirror is parabolized, you can either send it off to be aluminized in a vacuum chamber or you can silver it yourself (S&T: Jan. 2020, p. 74).
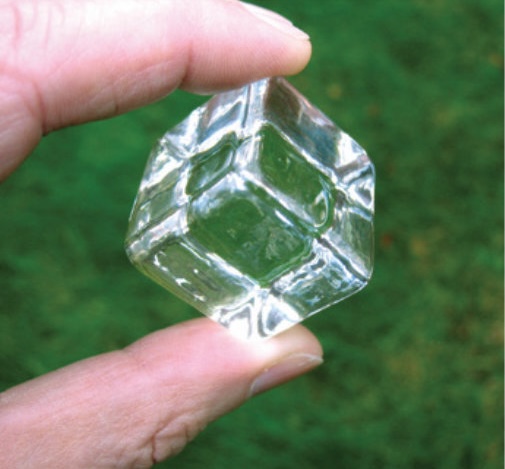 SLIGHT CHANGE One cubic inch of glass is a lot to remove by abrasion. You’ll remove five of these if you make a 10-inch f/5 mirror. A 30-inch f/3? 220 of ’em.
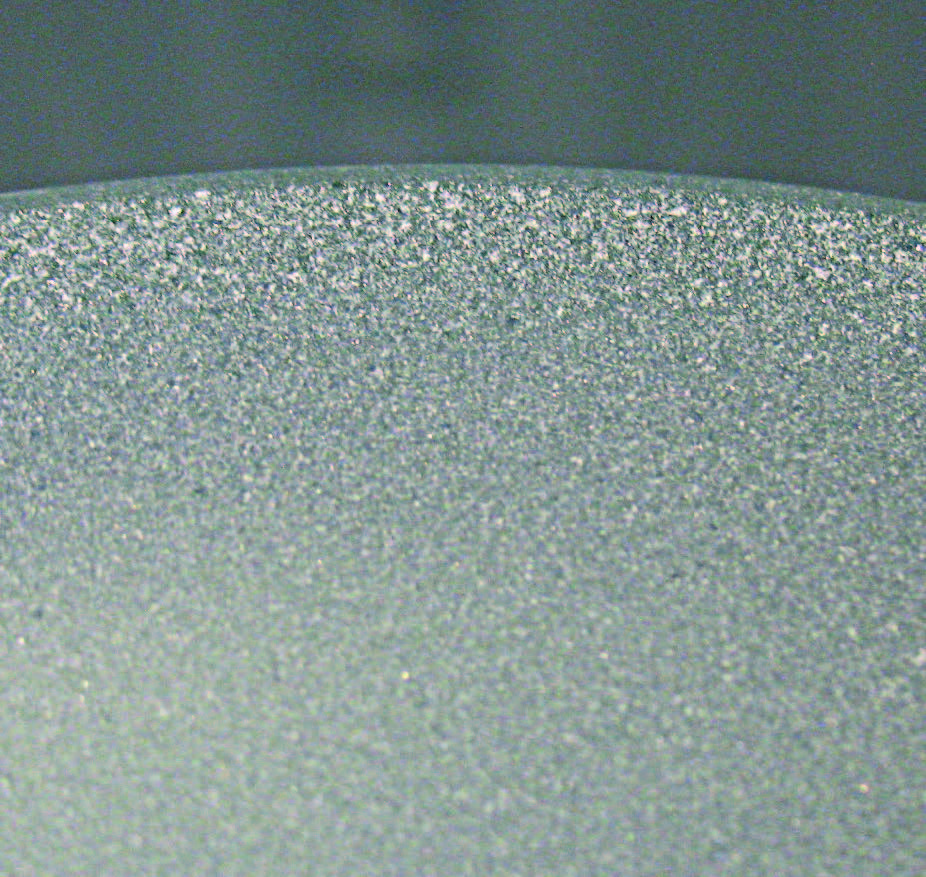 ROUGH SURFACE Coarse grit leaves deep pits in the glass that require successive wets of finer abrasives to smooth out.
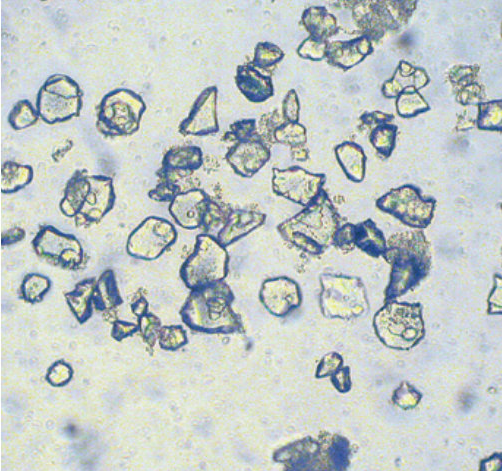 FINE POLISH Aluminum oxide grit particles are more plate-like, so they shear off high spots rather than gouging into the mirror’s surface.
The above grinding and polishing techniques have changed very little over the years. Ring tools and tile tools have replaced glass tools, and the Ronchi test has gained ground over the Foucault test, but the general method of making mirrors is pretty much the same as ever.
What has changed are some of the misconceptions. One misconception was that a telescope mirror needed to be at least 1/6 of its diameter in thickness. That was because stress analysis showed that a thinner mirror could flex by at least a quarter wavelength of light, and a quarter-wavelength error could affect the view. Turns out that was needlessly conservative. Mirrors are typically 1/15 or even 1/20 of their diameter in thickness nowadays and they still work fine, thanks to advances in the design of the mirror cells that support them in the telescope. For an 8′′ or 10′′ mirror, 3⁄4′′ plate glass is plenty thick if properly supported. And a bonus: Thinner mirrors mean shorter cooling times before they reach ambient temperature and can provide their best view.
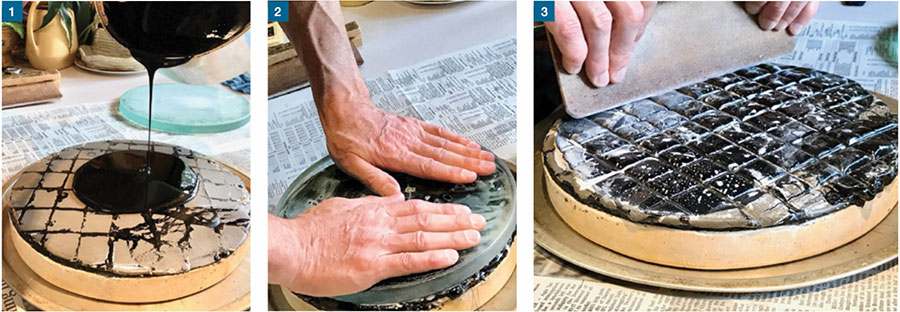 POLISHING TOOL Making a pitch tool is relatively straightforward. 1: First pour the molten pitch onto the substrate. 2: After the pitch has spread over the tool base, coat the mirror with cerium oxide and press it into the pitch in order to form a matching surface to the mirror’s sagitta. 3: Allow the pitch to cool, but while it’s still pliable, press channels into it for the cerium oxide slurry to flow into while polishing. Once completely cooled, you’re ready to start the polishing stage.
Another misconception from the old days is that you should start with a small mirror, say a 6′′, before trying an 8′′ or a 10′′ or larger. A 6′′ mirror requires less hogging out, but that’s about the only thing easier about it. It’s too small for most people’s hands, so it’s hard to grip, and it tends to rock back and forth while polishing, so you often wind up with a ferocious turned edge. The hardest mirror I ever made was a 6′′. You’re far better off starting with an 8′′ or a 10′′, or even a 12′′ if you have a little patience.
Patience is paramount. You need to go slow. At first that’s because your muscles aren’t used to this kind of motion and you need to build up your strength, but it’s also because impatience leads to mistakes, and mistakes lead to impatience. Grinding mirrors is a Zen sort of thing. Breathe deep. Take your time. Savor each step. You’re making an optical surface that’ll be accurate to better than a quarter wavelength of light and doing it with hand tools — tools you made yourself.
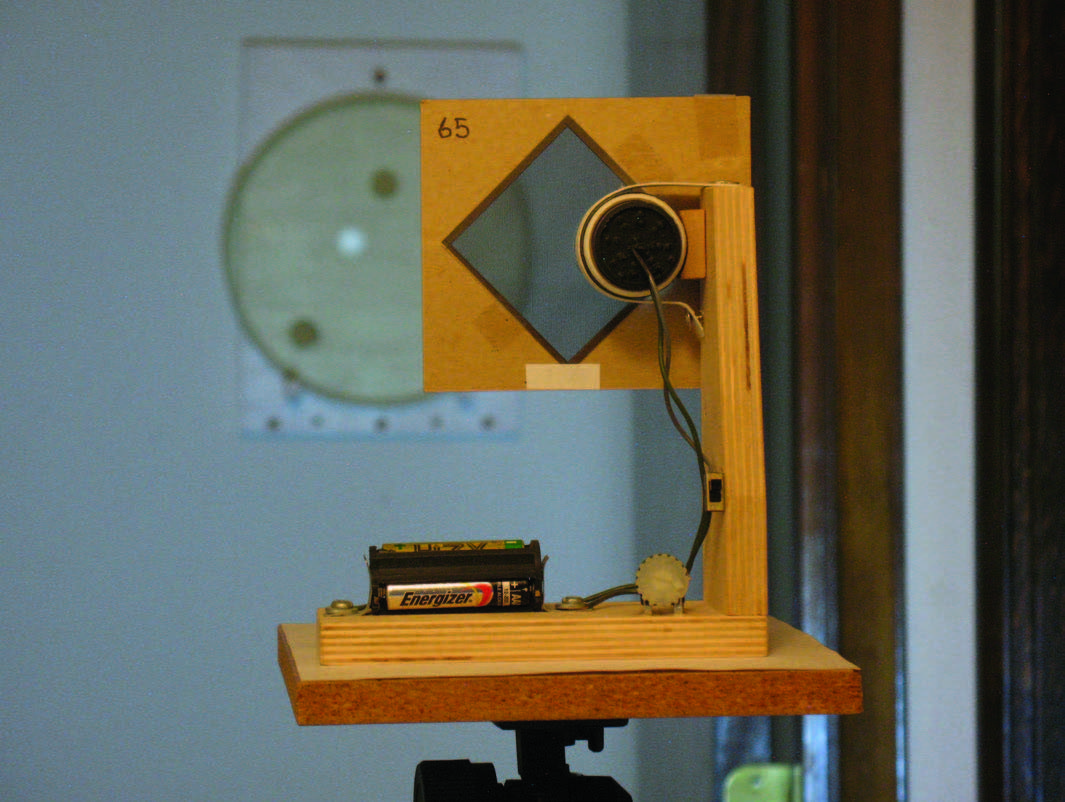 CHECKING YOUR PROGRESS The Ronchi test allows you to compare your mirror’s surface with a computer-generated test pattern. This is performed by placing a tester with a Ronchi grating and light source at the mirror’s radius of curvature.
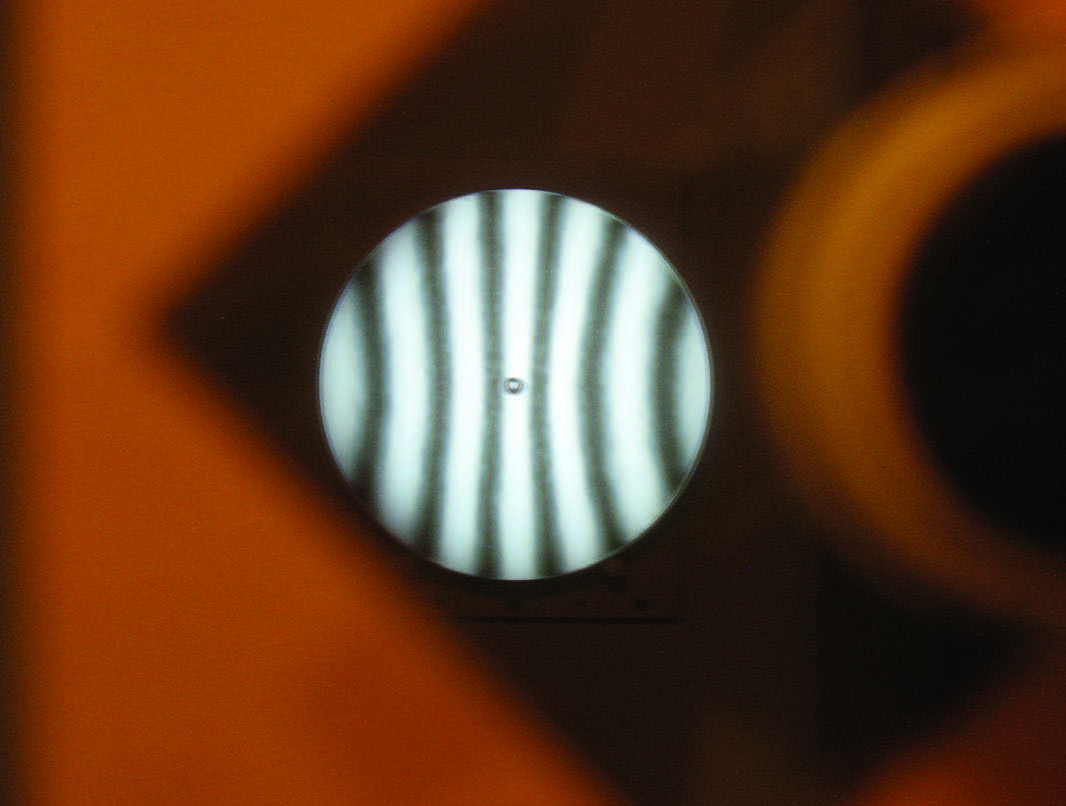 The Ronchi test pattern is visible when you look at the mirror through the grating that the light source also shines through.
Fast mirrors are popular nowadays. It’s tempting to shoot for an f/3 wide-field mirror, but avoid going too fast (say faster than f/5) with your first attempt. Parabolizing becomes exponentially harder the faster you go. You need to develop the necessary skills before you tackle a fast mirror.
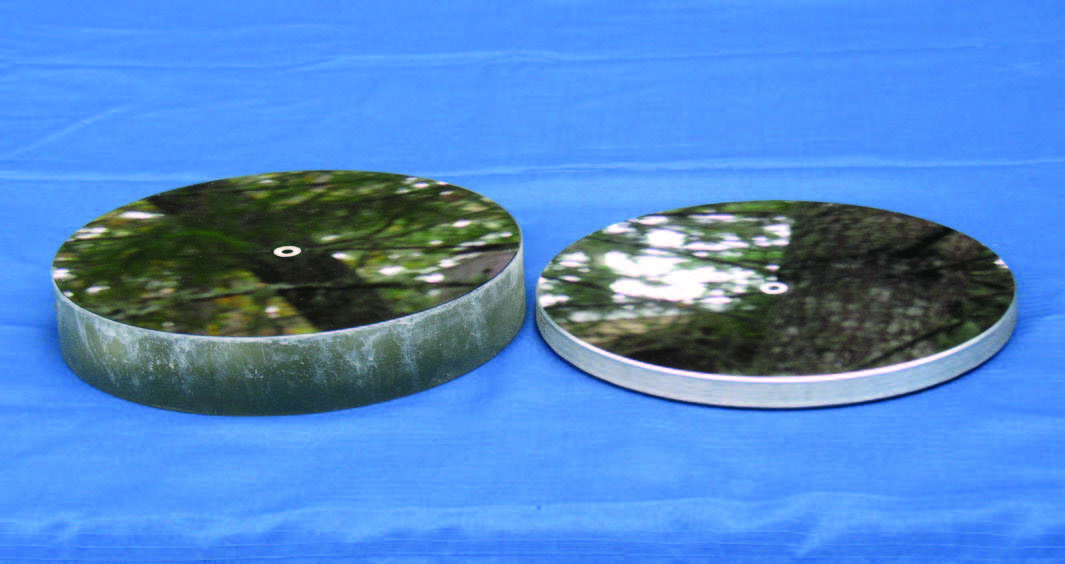 CHANGING TIMES Old-school mirrors were 1/6 of their diameter in thickness. Modern mirrors are much thinner but work just as well.
 And lastly, if at all possible, find a mentor. Someone who can stand right there beside you and demonstrate the techniques of grinding, polishing, and parabolizing in person. Someone who can watch you do it and catch mistakes before you dig yourself into a hole you can’t get out of. The success rate for people with a mentor at their sides is far, far (almost infinitely far) greater than for those who try to absorb it all from books or YouTube videos.
Above all else, approach mirror making as something to enjoy. Because you’ll probably wind up doing it again and again and again.
Further ResourcesMany of the telescope-making concepts referenced in this article can be found in greater detail on the Springfield Telescope Makers website at https://stellafane.org/tm/index.html
Amateur Rhett Mackend makes Ronchi grating films for testing platforms. He can be contacted at [email protected].
This article originally appeared in the July 2022 issue of Sky & Telescope.
Comments (0)