
Remember me


 STAR APPEAL Our perception of the quality of an image is highly influenced by how the field stars look, even when they’re not the main subject.
 For many of us, looking up at the stars got us hooked on astronomy. Stars are the most abundant objects in every deep-sky image, whether you’re targeting the thick of the Milky Way or framing a distant, isolated galaxy. In open and globular clusters, they’re literally the stars of the show. But in other compositions, bright stars can overwhelm dim structures such as the faint spiral arms of galaxies or the tenuous tendrils of supernova remnants.
The bottom line is that stars strongly influence our appreciation of an image, including our perception of its quality and beauty. Being mindful of how they look throughout the entire imaging process helps to strengthen their contributions to your overall composition. Here are some techniques I use to help the stars in my images shine brightly without stealing the show.
Work Begins at AcquisitionMost imagers agree that stars should appear small and round (though brighter stars will appear bigger) and brighten towards the center. Their colors vary, rather than appearing as white balls. The myriad suns in natural-color astrophotos ideally should display a range of hues, from blue to gold and even a few reddish ones.
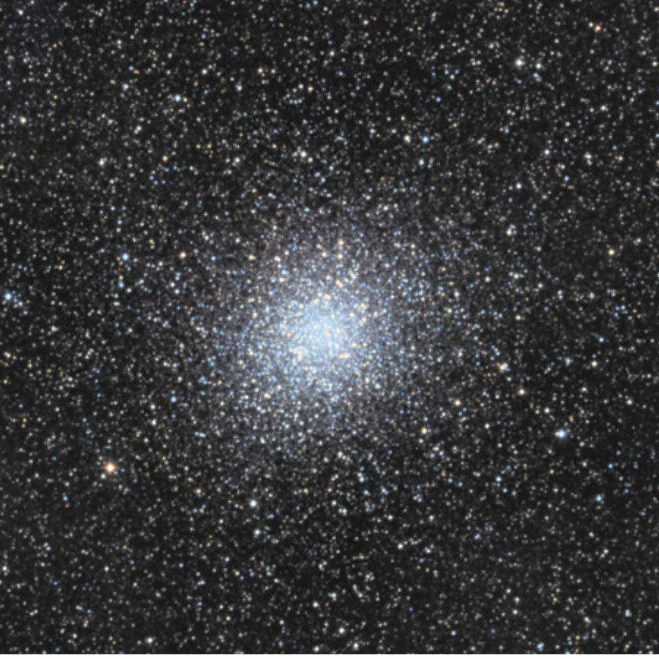 HIGH DYNAMIC RANGE Some targets have such a wide range of brightness that they can’t be recorded in a single image. The solution is to record them with exposures of varying lengths. This image of globular cluster M22 comprises 3-minute exposures to record the bright inner regions combined with 10-minute shots that record the faint outer regions. Both sets of data were processed separately then combined together so that the short image fills in the over-exposed core region in the 10-minute stack.
Careful image processing can do wonders to repair all kinds of image flaws, but most would agree that it’s better to prevent those flaws in the first place. Star quality — the size, shape, and brightness profile — is a good indicator of the level of detail in the underlying data. Keeping stars tightly focused and perfectly round ensures that you’ll get the most detail out of your intended deep-sky target.
No matter what optics you use, excellent polar alignment is essential to minimize drift during long exposures. I image at a scale of 3⁄4 arcseconds per pixel, so I align my mount to within a few arcminutes of the pole. This produces no visible drift or field rotation in exposures up to 20 minutes duration. A coarser image scale, say, 3 or 4 arcseconds per pixel, is more forgiving of polar-alignment errors.
After polar alignment, the next critical step to ensuring good stars in your image is perfect focus. Every telescope on the market today changes focus slightly throughout the night as the temperature drops, causing the tube and optics to shrink slightly. That’s why you need to check focus frequently during the night. In my locale, the temperature can drop more than 15°C (27°F) during an all-night imaging run. As a rule, I check focus every 30 minutes. The small amount of time this takes — about two minutes per hour of imaging time — is repaid in the end with tightly focused stars in virtually every subframe. Some acquisition software, like the freeware N.I.N.A. (nighttime-imaging.eu), automatically detects increasing star-size trends, refocusing as necessary.
Chances are good that the various filters you need when color imaging with a monochrome camera won’t all come to focus at the same position. To compensate, you should plan to refocus after every filter change. Some camera-control programs include a focus-offset option that allows you to program the focus position for each filter. After that, you only focus with one filter every time, and the software automatically makes the necessary focus adjustments when other filters are selected.
Star images quickly reveal any problems with your imaging system. For example, if the in-focus stars at the center of the field look great, but stars are oblong in one or two corners of the frame, this indicates that your camera’s detector isn’t positioned squarely to the focal plane. Many issues can be diagnosed with a short exposure of a star field. Making sure every connection is fastened securely and you’ve followed the manufacturer’s spacing requirements for your field flattener or focal reducer are both critical to achieving sharp, round stars across the entire field. A difference of a single millimeter can noticeably distort the stars at the edges of the field.
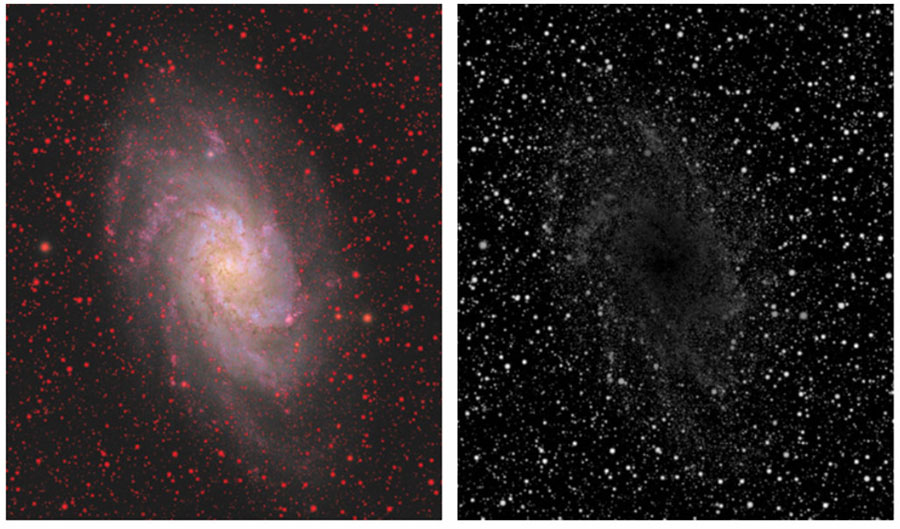
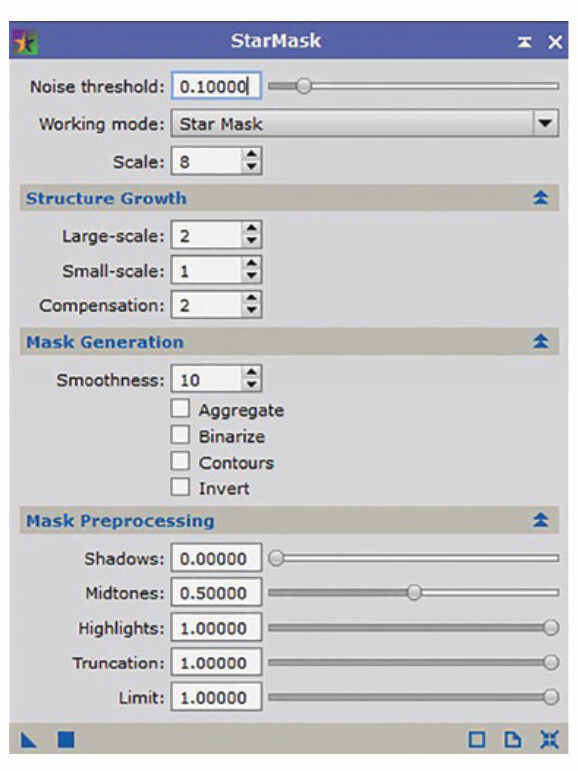 STELLAR STENCIL Mask stars with PixInsight’s StarMask tool (screenshot shown here), which appears as red over the image of spiral galaxy M33 (below). The mask protects the stars from enhancements made to the galaxy and background sky.
 The mask targets stars for specific adjustments or shields them from processes intended for the faint nebulosity or galaxy arms in an image.
 Another important consideration when recording your image is finding the right exposure. Some objects have a huge brightness range and can be surprisingly challenging to capture and process. Densely packed globular clusters like M22, or the cores of galaxies like M31 (the Andromeda Galaxy), may saturate in exposures of about 10 minutes, but very short exposures don’t record the faint outer areas in such targets. The solution is to shoot both short and long exposures and combine them, using the short-exposure image to replace the saturated pixels in the long-exposure frames. This type of blending is known as high-dynamic-range (HDR) imaging.
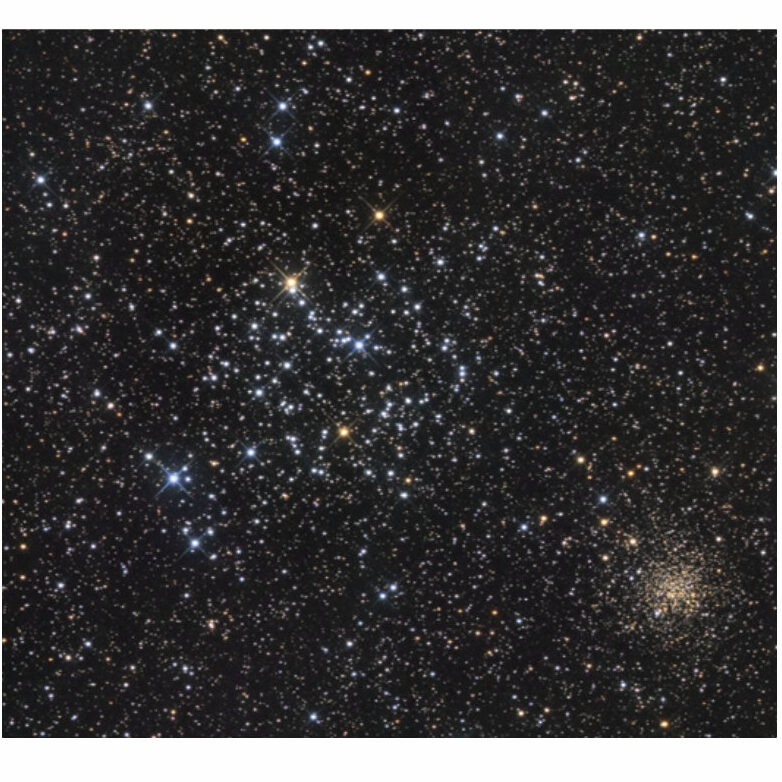 SUNS EVERYWHERE Stars are the subject in photos of open clusters. Here the smaller, redder color of distant members of NGC 2158 (lower right) are a strong visual cue that the object is farther away and older than sprawling Messier 35 at the center of the field.
Once you’ve mastered the acquisition stage with careful attention to the stars in your chosen field, it’s time to make the most of your hard-won images. I prefer PixInsight for processing my deep-sky astrophotos, but you can adapt the tips described in this article to your preferred software.
The current trend in deep-sky image processing is to isolate the stars from the rest of the image elements (nebulosity, for example) during certain stages. The most direct approach is to create a star mask, which works like a “star stencil” that permits changes to the stars without affecting the rest of the image, and vice versa. Isolating the stars allows you to boost star colors, for example, without affecting the surrounding nebulosity. Similarly, you don’t necessarily want the contrast
adjustments you make to the nebulosity to apply to your stars. Most software packages include simple tools for making such a mask; in PixInsight this is done with the StarMask tool. A similar mask is made in Adobe Photoshop using the Color Range tool, selecting a few stars, and clicking the Add a Mask option at the bottom of the Layers window. Masks can themselves be processed like any other image and made to be more effective at meeting your specific needs. For example, you can enlarge or reduce the white parts of the mask, soften or sharpen edges, or adjust the contrast to allow it to better select/protect different image elements.
Another method for isolating stars is to temporarily remove them completely from an image and replace them later. The method was pioneered by astro-imager J-P Metsävainio (astroanarchy.zenfolio.com), whose work led to the development of sophisticated star-removal-tool software and plug-ins in recent years. PixInsight’s standard installation includes the original Starnet++ process. The freeware Star-Net v2 is superior and is available for Windows, MacOS, and even as a command-line tool for Linux at starnetastro.com. There’s also a plug-in by Russ Croman called StarXTerminator for both Adobe Photoshop and PixInsight that works well. It’s offered at www.rc-astro.com for $59.95. I use StarNet2 in PixInsight on my images after I’ve combined all my RGB and luminance data. I then run the resulting file through the StarNet2 process, which generates a starless image. This starless image lets me be a little more assertive with the processing steps aimed at the non-stellar parts of the image and apply stronger noise reduction, sharpening, and contrast adjustments — all of which can potentially damage the field stars. The stars are then reinserted using PixelMath in PixInsight, where I add together the starless version with the file that includes the stars. I can also vary the prominence of the stars by reducing or increasing the value that the star layer contributes to the result, depending on the desired outcome.
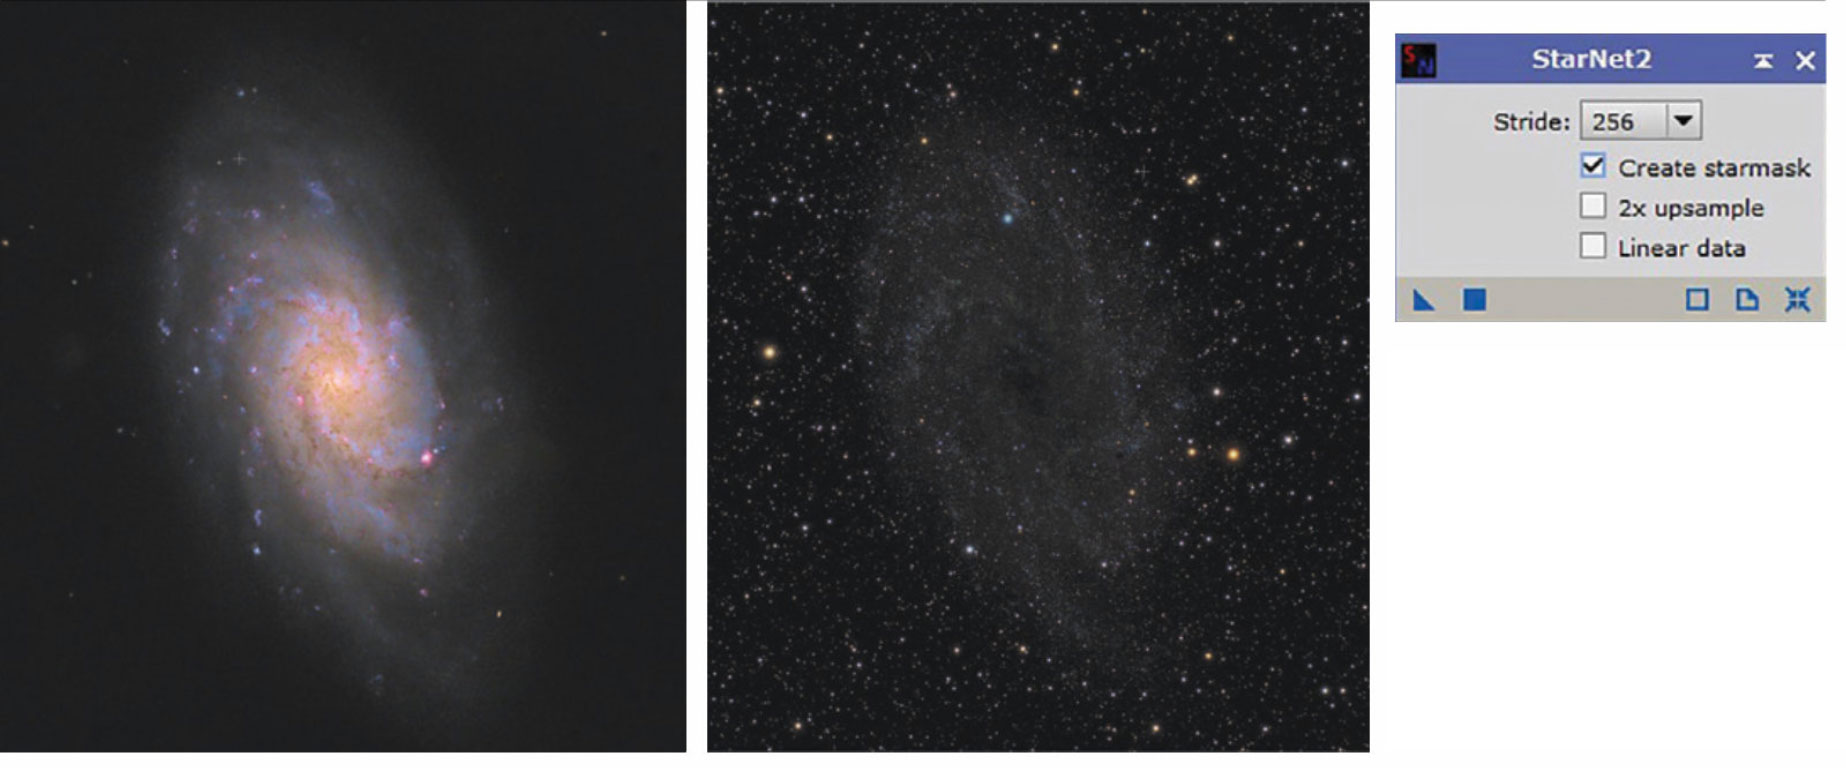 SEPARATE TREATMENT Completely removing the stars permits more aggressive enhancement and noise reduction to other parts of the image that can adversely affect the stars. This example shows the StarNet2 tool in PixInsight separating the stars from a picture of M33. The two sections are recombined later in the process.
Prominent stars or a particularly star-rich field can overwhelm adjacent deep-sky objects that are typically our main imaging subject. A good example of this is the Veil Nebula supernova remnant in Cygnus. In situations like this, I often employ a two-step process in PixInsight to reduce the intensity of the stars. I start by making a star mask then applying a shape-changing process to shrink the stars using the MorphologicalTransformation tool. I adjust the amount of reduction using the Amount slider — a little bit goes a very long way, so don’t go more than 0.5. If this dims the stars too much, apply a slight brightness boost using the CurvesTransformation tool with the mask still in place.
Sometimes there’s just one very bright star that requires taming. I dial its brightness down without affecting the rest of the image by using a mask that selects only that star and its halo. I often make a large, single-star mask using the GAME custom script for PixInsight, which is available from https://is.gd/piplugin. I make sure the mask edges are nice and soft so the modified star maintains a natural appearance and blends in well with its surroundings.
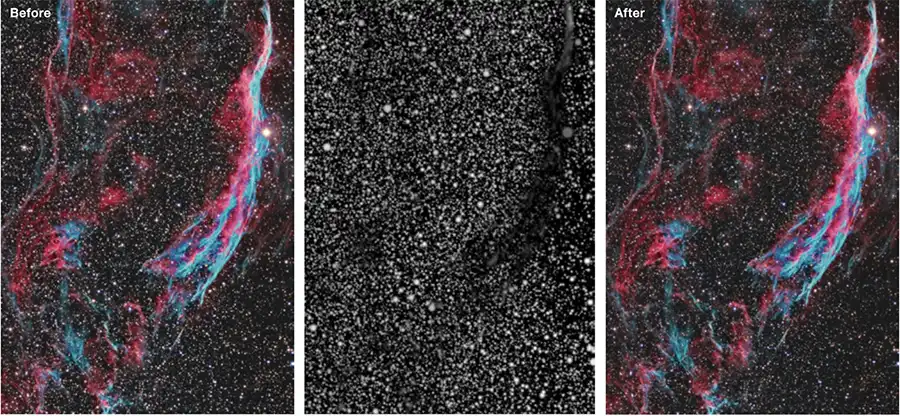 LESS IS MORE Reducing the size of the stars helps to improve the prominence of non-stellar subjects in some star-dense areas of the Milky Way. Here the author applies the MorphologicalTransformation tool with a star mask (middle) to protect the background sky and supernova remnant.
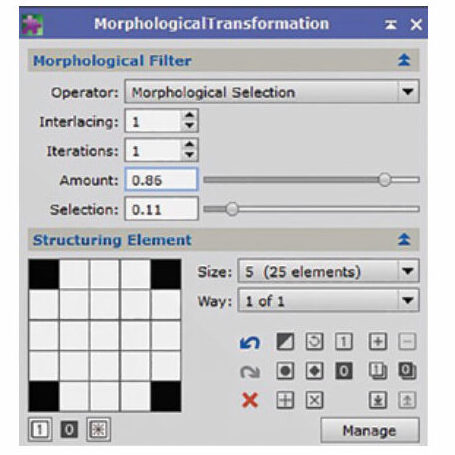 Screenshot of the MorphologicalTransformation tool
Fixing Guiding Errors
Screenshot of the MorphologicalTransformation tool
Fixing Guiding Errors
Don’t despair if, despite your best efforts, the stars in your raw images are slightly elongated throughout the field. You can fix very minor tracking errors in processing, but understand that if the stars are elongated in your image, then so is everything else. That means that the nebulae or galaxies in your picture will be slightly blurred.
Correcting elongated stars should happen before applying any non-linear stretching. I make a star mask, then use the Deconvolution tool, where I select the Motion Blur PSF tab. I can then adjust the Length and Angle sliders until I see the star become round in the preview window. Another option is to open the MorphologicalTransformation tool and select the min+max/2 mode to round out the stars. I sometimes need to try more than one method and experiment with each tool’s settings to get natural-looking results.
Elongated, color-separated stars that appear toward the corners of a frame is a type of optical error known as lateral chromatic aberration. Fast camera lenses and some refractors using field flatteners and focal reducers are prone to this defect. The problem is easily correctable early in the workflow by using a high-precision star-alignment tool to improve registration of the individual color channels. Simply align the red- and blue-filtered images to the green one and then combine to make a color image as usual. Astroimagers using color cameras will need to separate the color channels into the three primary color components first, then align them and recombine the results. In PixInsight I use the StarAlignment tool in its Thin-plate Splines mode, with the Local Distortion option engaged to get the most precise alignment possible.
The specialized image-registration program RegiStar (aurigaimaging.com) also does a great job re-registering lateral chromatic aberration. Again, color-camera users will need to split the color channels first using Operations > Split by Color.
Narrowband astrophotographers can benefit from some star-care actions, too. Because the three narrowband images require aggressively stretching the O III- and S II-filtered images compared to the Hα image, the results produce stars with a strong magenta halo. While some don’t mind the appearance, there’s a fix to make the color look more natural. Using PixInsight, first invert the image, then open the SCNR tool and select Green in the Color to remove section and apply the tool. Finally, invert the image back to its original form. The magenta will be gone, and the star colors will be less intense.
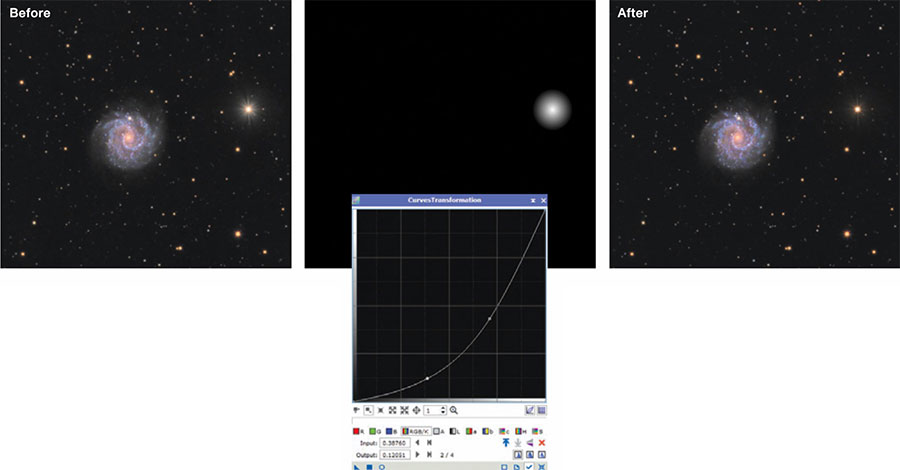 ONE AND DONE An exceedingly bright star may distract attention from the main subject of a composition. Here, a mask is used to tone down the prominence of 6.6-magnitude SAO 43270. The star’s brightness was then reduced with the CurvesTransformation tool to put the focus back on galaxy NGC 3184.
The appearance of stars in our images has a big impact on how we perceive overall quality of a picture. Imperfect stars distract us from the main subject and likely mean that other parts of the image are less than optimally processed. On the other hand, small, round, natural-looking stars can enhance the photo without getting in the way. Even if your stars look great right out of the camera, you can improve them by careful post-processing. Remember, it was probably a sky full of tiny, beautiful pinpricks of light that first enchanted you. See if you can capture some of that magic in your astrophotos by letting the stars shine!
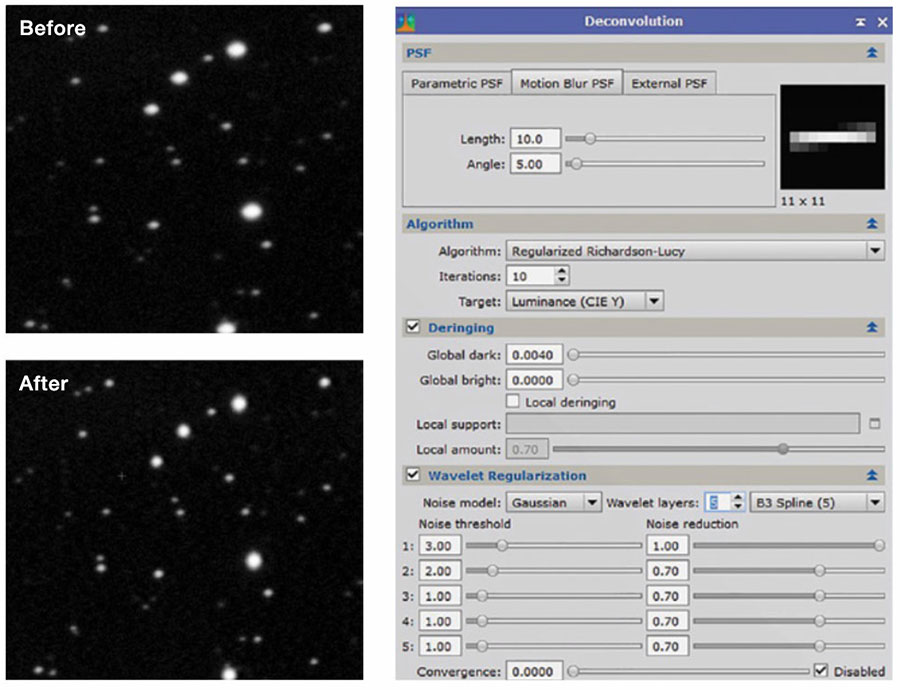 STELLAR ROUND-UP Using the Motion Blur PSF tab in PixInsight’s Deconvolution tool (right) can fix errors like slightly oblong stars.
Contributing Editor Ron Brecher often hosts workshops on deep-sky image processing with PixInsight. Visit his website at astrodoc.ca. This article originally appeared in the September 2022 issue of Sky & Telescope.
Comments (0)