
Remember me

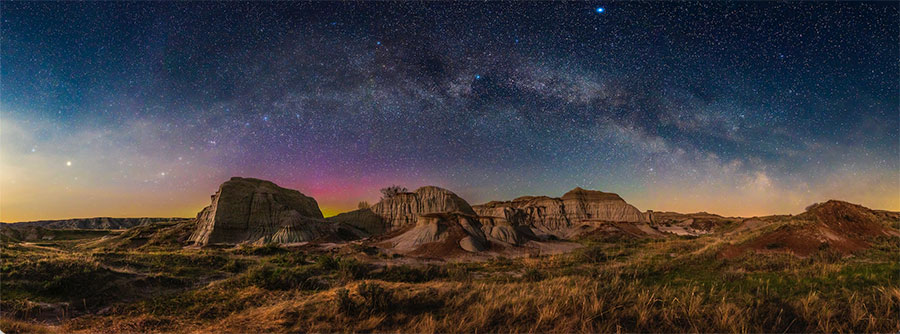


 MILKY WAY OVER THE BADLANDS While dark-of-the-Moon nights are usually preferred for Milky Way panoramas, moonlight can bath the landscape with warm, natural illumination. This was shot on a mid- May night illuminated by a waxing crescent Moon at Dinosaur Provincial Park in Alberta, Canada.
Some of the most popular and dramatic nightscape photographs are not single images but panoramas (“panos” in the lingo), composed of several frames blended together to make one seamless scene.
Shooting and then assembling multiple, overlapping images is certainly more work. But the reward is a picture covering more of the scene and with higher resolution and detail than a single image can provide. If your goal is to produce stunning, wide-angle nightscape images, panoramas are the way to go.
Panorama SubjectsWhile panoramas of the Milky Way are the most obvious target, they can also be the most difficult, requiring long exposures and high ISO settings. Other sky subjects lend themselves to panoramas that can be easier to shoot, making them suitable for honing your pano skills. For example, aurorae can stretch across a large swath of sky (to the north for the aurora borealis, to the south for the aurora australis). To capture the full display, you simply take an overlapping series of individual frames and stitch them together later using software. In this case, I’ll use a fast 20-mm-to-24-mm lens to shoot several segments quickly before the display changes structure enough to make seamless stitching difficult.
Noctilucent clouds, a phenomenon unique to higher latitudes near summer solstice, can, on rare occasions, cover half the sky. More often they hug the horizon. I prefer to shoot these with a short telephoto lens, such as an 85-mm or 105-mm, taking as many frames as needed to cover the display. The resulting panorama better resolves the fine structures that noctilucent clouds often exhibit.
My other favorite use of panorama techniques is for framing the wide arc of Earth’s blue shadow and the pink Belt of Venus (the alpenglow visible above the antisolar point) at sunset or sunrise, or a lineup of planets across the twilight sky. The segments of these twilight scenes must be recorded quickly, as sky colors can change enough in a minute to make a smooth blend a challenge.
When shooting any panorama, be sure to use the same manual exposure settings for all frames. Using auto expo- sure, say, for twilight scenes, can produce segments that vary too much in brightness to blend seamlessly.
A Good PlanWhile aurorae, noctilucent clouds, and twilight panoramas do take some practice at the camera, Milky Way panos also take planning. Framing the arch of the Milky Way can be done only when it’s confined to one half of the sky, rather than when the Milky Way is directly overhead. The nightscape community speaks of a “Milky Way arch season” when the galaxy is best placed for such portraits.
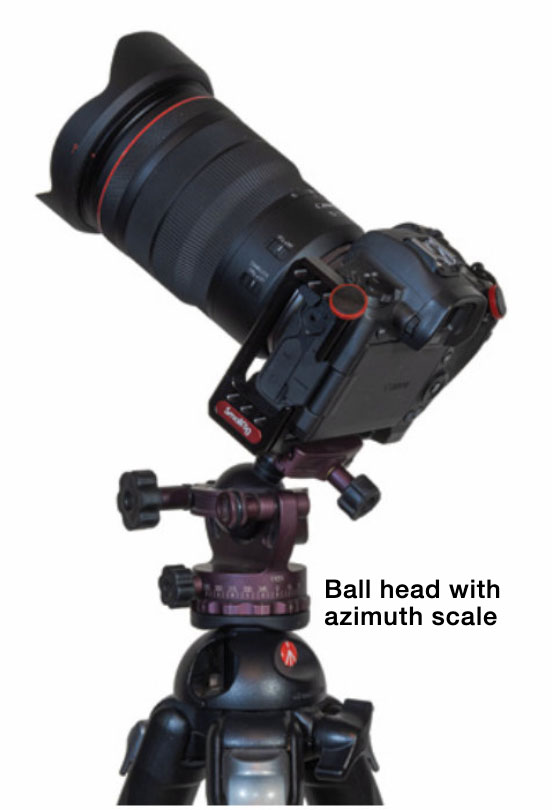 ESSENTIAL GEAR The minimum requirement for panorama shooting is a tripod head with an azimuth motion graduated in degrees, typically in 5° increments with every 15° labeled.
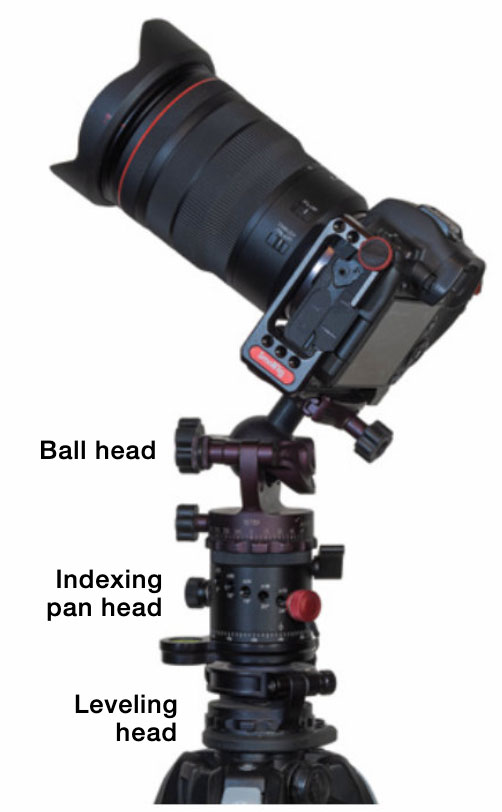 RECOMMENDED ADDITIONS A leveling head helps ensure the camera rotates parallel to the horizon, while an indexing pan head makes it quick to move from segment to segment in the dark.
In the Northern Hemisphere, this season runs from mornings in February to evenings in June. This is when the galaxy spans the eastern half of the sky, from Perseus in the north to Sagittarius rising in the southeast. There’s a second and less well-known Milky Way arch season: During February and March evenings, the dimmer winter Milky Way and panoply of bright stars in and around Orion set in the west.
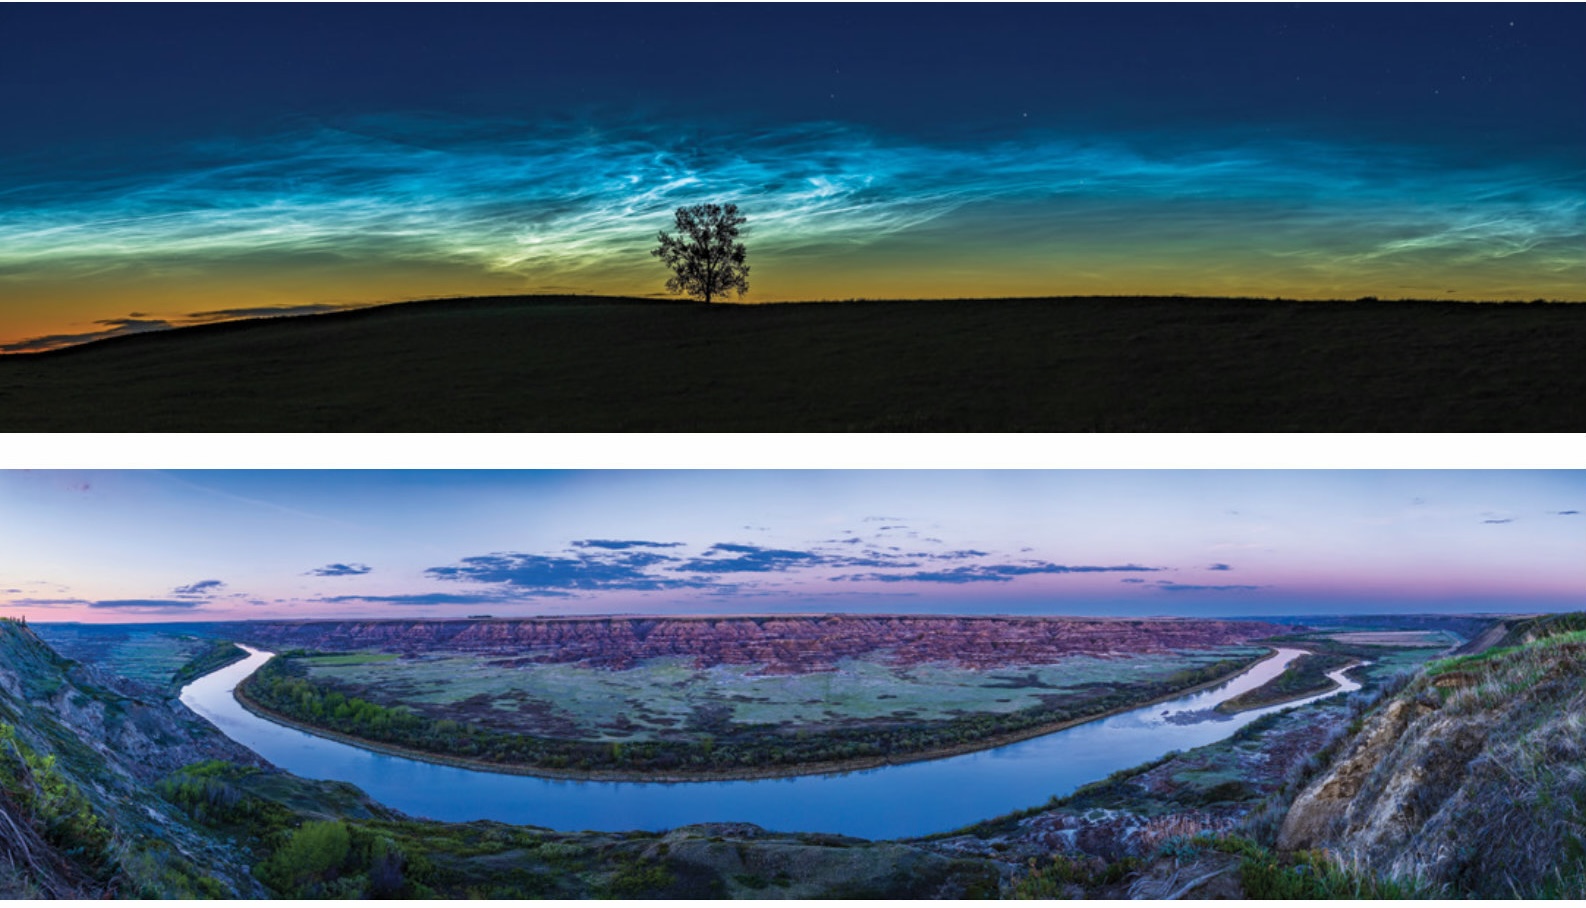 WIDE SKY SUBJECTS The noctilucent clouds panorama (top) is made of six segments with an 85-mm lens, stitched in Adobe Camera Raw (within Photoshop). The twilight scene above is assembled from nine segments shot with a 28-mm lens and stitched using Photoshop’s Photomerge command.
From the Southern Hemisphere, the season is similar, but the Milky Way is very different. It arcs high across the south on austral autumn nights, from Orion setting in the west to Scorpius rising in the east. September to November spring evenings bring another opportunity for austral photographers to frame the arch of the Milky Way as it spans the western half of the sky with the galactic core setting.
A planetarium program or app such as Stellarium (stellarium.org) or SkySafari (skysafariastronomy.com) is indispensable for previewing when and where the Milky Way will be visible. These apps include the ability to add field-of-view indicators for your gear so you can tell what lens and camera orientation will work best to frame your composition.
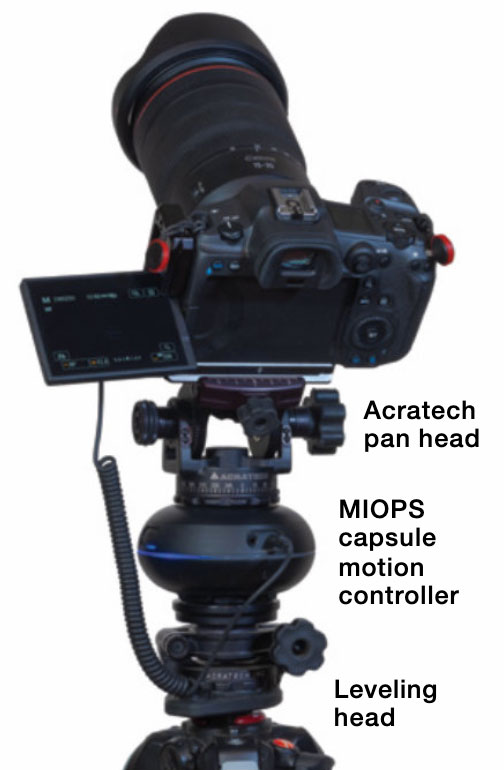 PROGRAMMING PANOS The MIOPS Capsule360 (since superseded by the newer Capsule Pro) connects to the camera to fire its shutter automatically after every programmed move to a new segment.
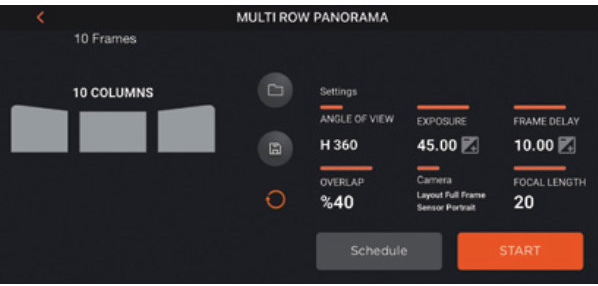 The mobile app then calculates the number of segments needed to cover a given field based on the lens and overlap amount desired.
Even more useful are specialized apps such as The Photographer’s Ephemeris (photoephemeris.com) or PhotoPills (photopills.com), which show where the Milky Way and its photogenic galactic core will be in relation to the landscape features at your chosen site.
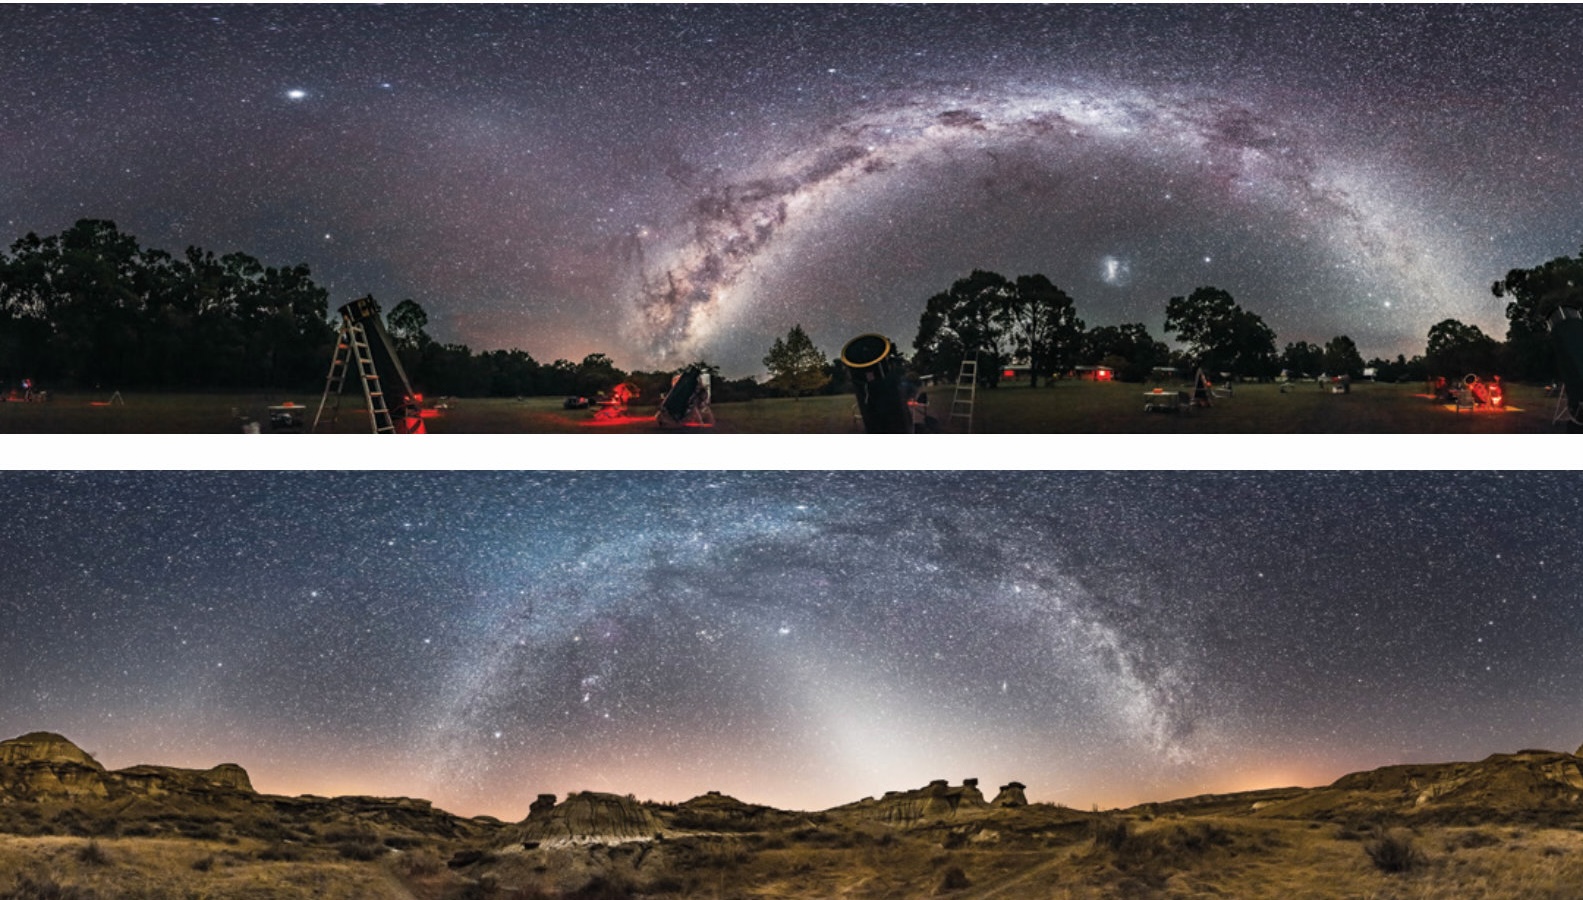 TWO OTHER MILKY WAYS While the Northern Hemisphere’s summer Milky Way gets the most attention, the austral autumn Milky Way (left) is even more impressive. This April scene was shot at a star party in New South Wales, Australia. Northerners can catch the arch of the winter Milky Way in February (bottom) when the zodiacal light often adds to the sky scene.
What gear do you need besides your camera and a few lenses? A tripod head with an azimuth scale is essential. This allows moving the camera horizontally by a consistent amount, typically by 15° to 45°, from frame to frame.
There are two additional items I consider invaluable for serious pano photography. A leveling head that goes between the tripod and tripod head makes leveling the camera a quick and easy task, with no need for trial-and-error adjustments to the tripod legs. Level your tripod head first, then use your camera’s built-in level to ensure it isn’t tilted left or right, so its frame is parallel to the horizon. If either the tripod head or camera is not level, the final panorama will still stitch together but will undulate up and down across the horizon, requiring a lot of warping and cropping to correct.
The second accessory I suggest is an indexing pan head that goes between the leveling head and normal tripod head. These have click stops at preset spacings, typically adjustable from 5° to 90° apart — enough to cover most camera-and-lens combinations. This allows you to quickly move the camera from one click stop to another just by feel.
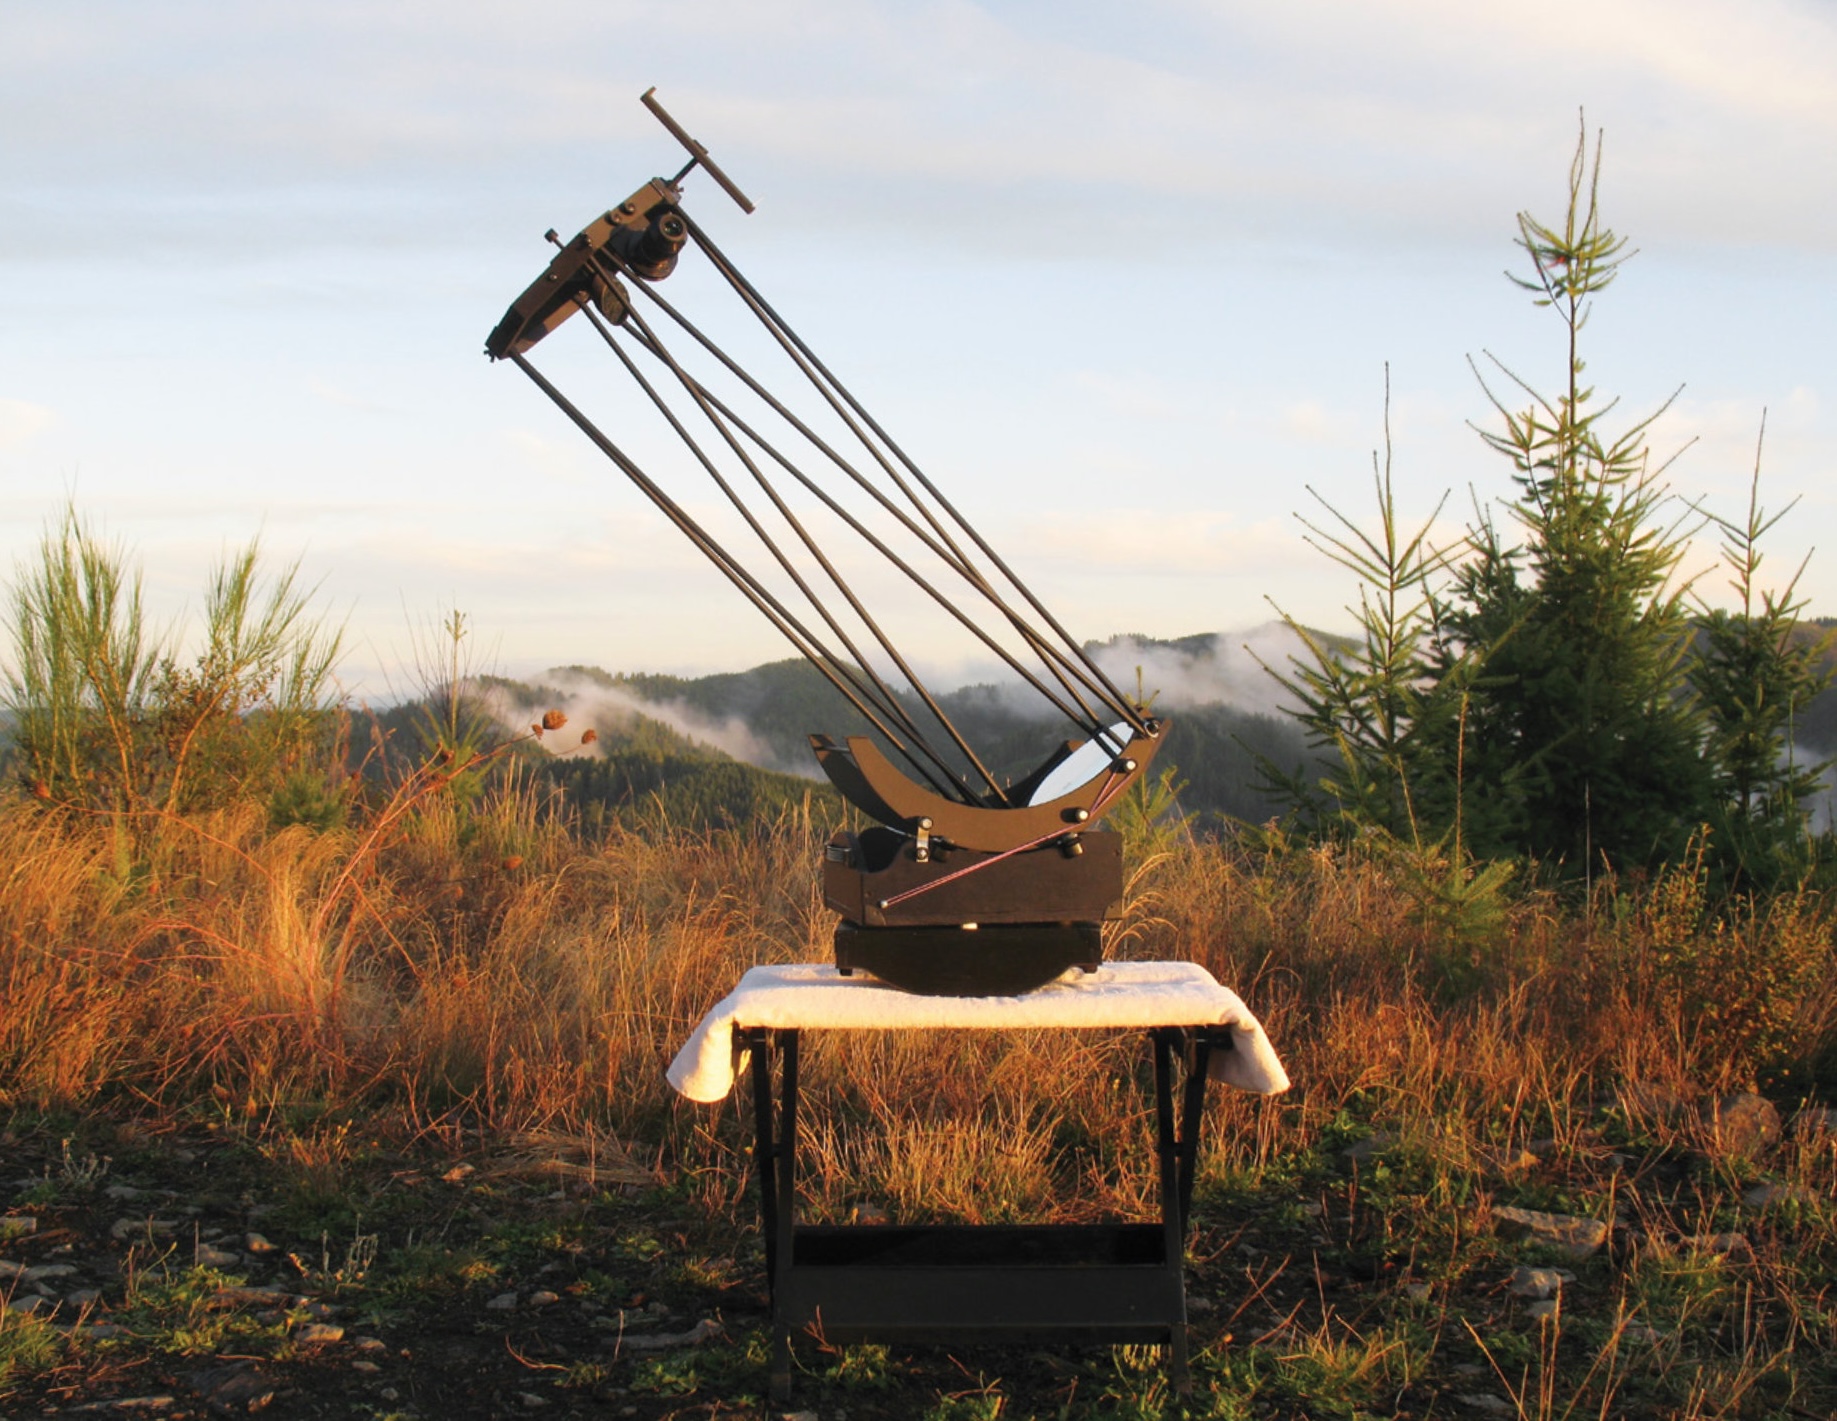
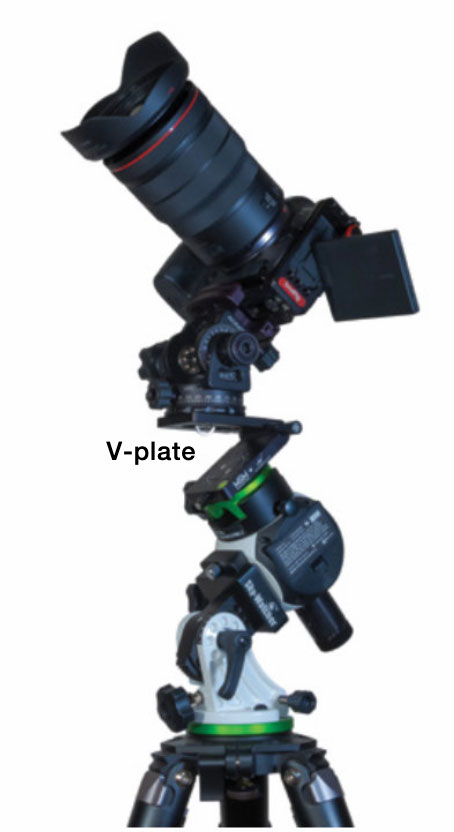 TRACKING PANO GEAR Star trackers like the Star Adventurer Mini shown here are best paired with an angled V-plate so the camera can be turned parallel to the horizon while still tracking the sky. This pan head’s altitude axis is also marked in degrees for precise, incremental vertical movements.
Automating and Tracking
TRACKING PANO GEAR Star trackers like the Star Adventurer Mini shown here are best paired with an angled V-plate so the camera can be turned parallel to the horizon while still tracking the sky. This pan head’s altitude axis is also marked in degrees for precise, incremental vertical movements.
Automating and Tracking
Wouldn’t it be nice to automate the shooting? I reviewed a unit for doing just that in our September 2016 issue. The iOptron iPano works great, but it’s a large piece of gear to heft if you have to hike to your chosen site. However, a motorized pan head does make it easier to shoot complex “gigapans” that might extend horizontally a full 360°. These all-sky panos require 10 to 12 segments and can extend up to the zenith, requiring two to four rows, or tiers, totaling up to 48 segments — a lot to manually move between and shoot!
More affordable and portable options include single-axis controllers designed primarily for time-lapse shooting, such as the Edelkrone HeadONE (edelkrone.com), Manfrotto Genie Mini II (manfrotto.com), or the MIOPS Capsule Pro (miops.com). All offer programmable panorama modes set with a smartphone app that communicates via a Bluetooth LE connection. You can pair two units and program both the horizontal and the vertical movements needed for multi-tier panos. I prefer to keep things simple and sturdy, using just a single-axis controller for the horizontal moves. I perform the vertical changes manually, as only two or three are needed at most.
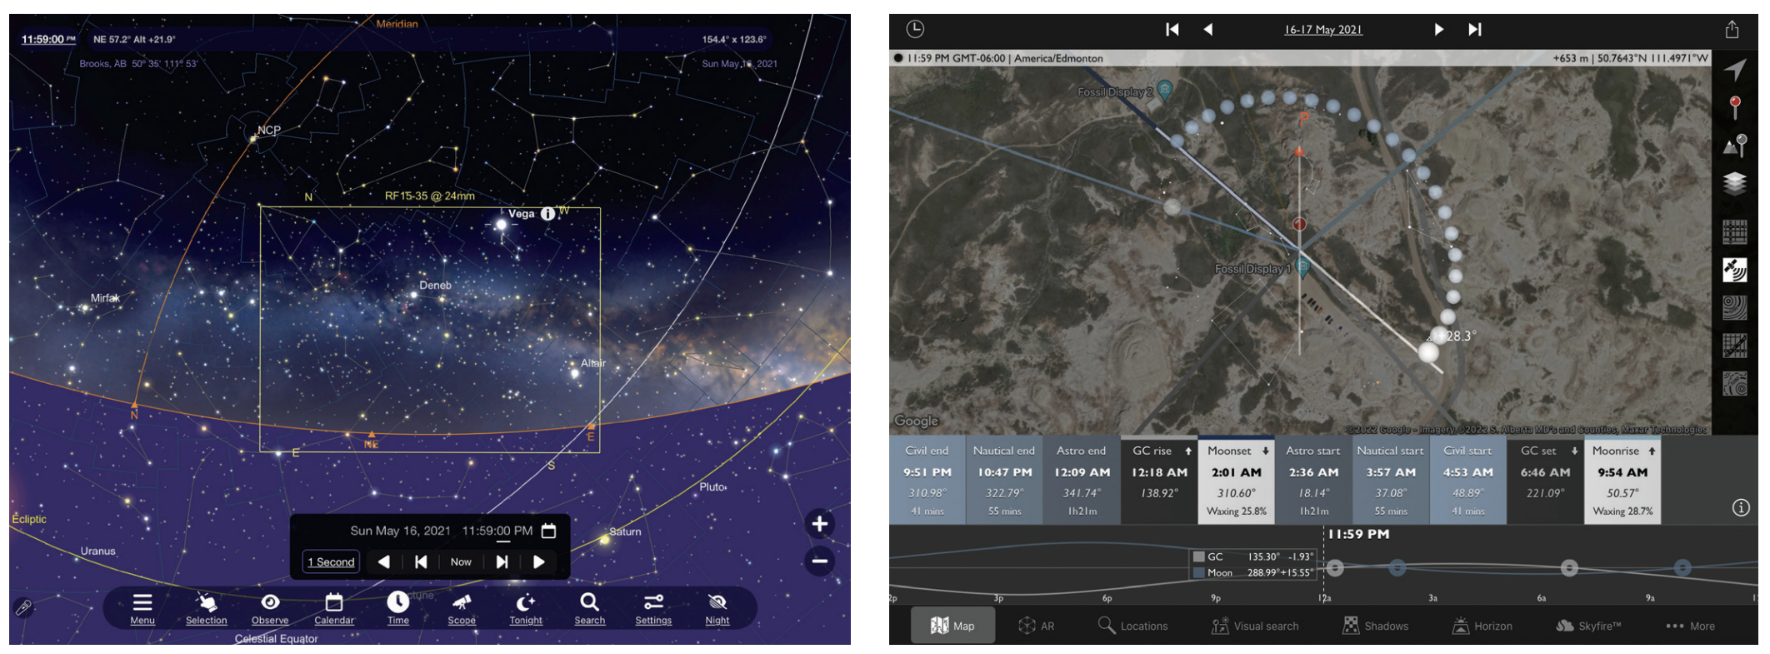 PLANNING APPS Left: This SkySafari screenshot shows the field of view of a 24-mm lens in landscape orientation framing the rising Milky Way and Lyra. The Photographer’s Ephemeris app (right) displays the terrain at the shooting site, indicating the setting Moon and the rising Milky Way as an arc of dots. Both apps are set for the location where the badlands panorama on the opening page was captured.
Can you track the sky during a pano shoot to ensure pinpoint stars? Absolutely. I like to use Sky-Watcher’s Star Adventurer Mini tracker for its accuracy, compactness, and light weight (S&T: Dec. 2017, p. 58). I combine it with an Alyn Wallace V plate sold by Move-Shoot-Move (moveshootmove.com). The angled plate allows turning the camera parallel to the horizon manually from segment to segment while the tracker follows the sky.
Although trackers allow longer exposures, avoiding star trailing while recording more detail in the sky, I find exposures are best kept to no more than one to two minutes for each segment. Each segment can then be captured within a span of 10 to 20 minutes — before the sky turns too much. This simplifies the blending of the sky images with the ground segments, which are best framed and shot first with the tracker’s motor off to prevent the ground from blurring.
Blending the tracked and stationary panoramas takes some deft work in Photoshop, usually requiring nudging the masked ground layer up to hide the blurred (and possibly misaligned) horizon in the star-tracked layer.
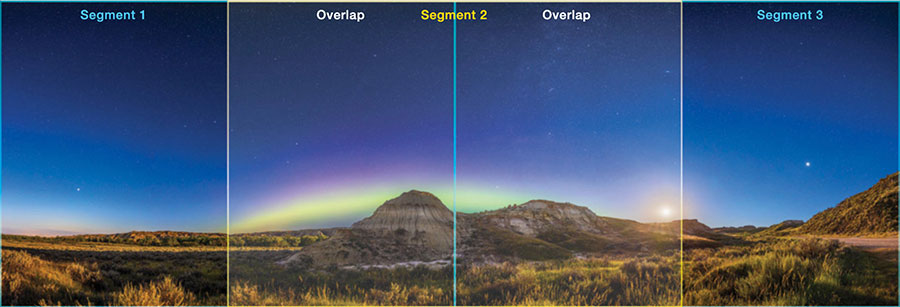 WIDE PANORAMA For this panorama, a full-frame camera with a 14-mm lens in landscape orientation covers the 180° scene in three segments with 50% overlap.
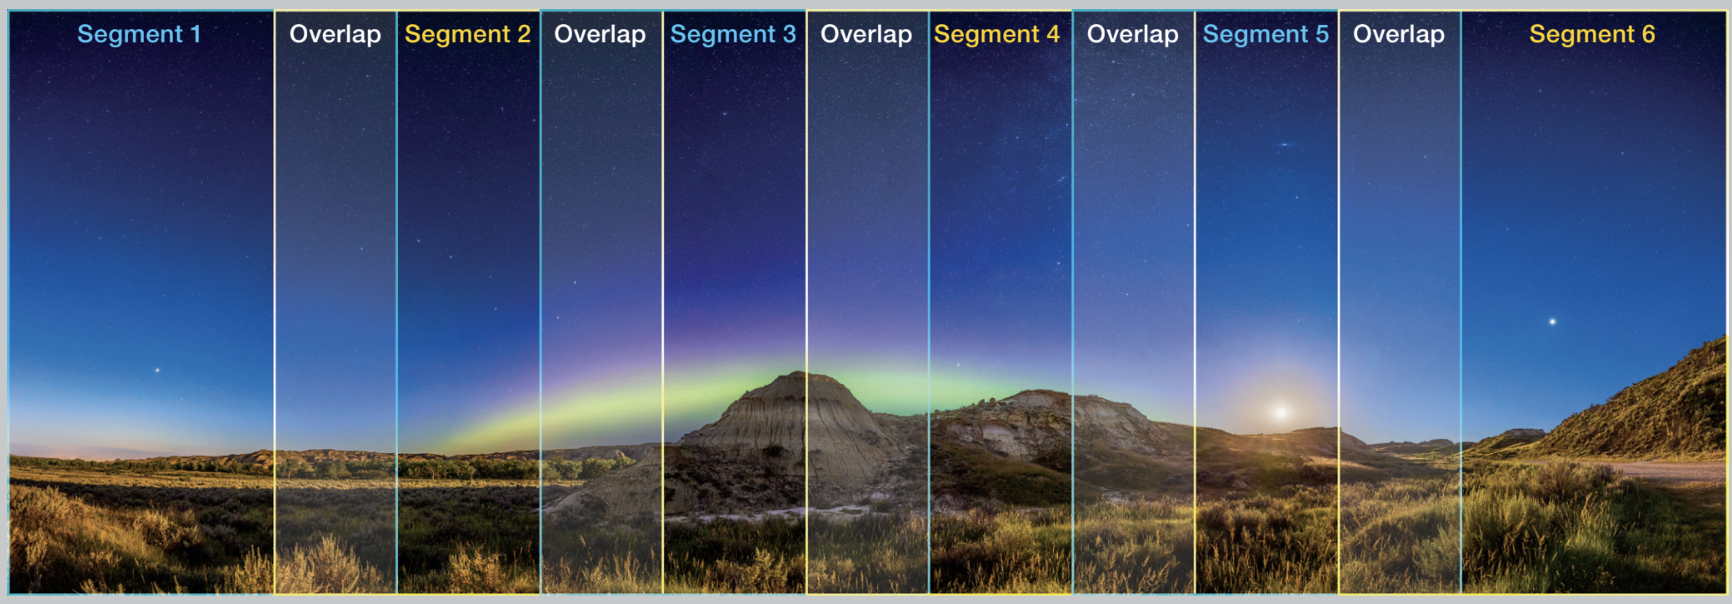 GOING TALL Using a 20-mm lens and turning the camera 90° provides the same vertical coverage with greater resolution, though it requires six segments with a minimum of 30% overlap.
Next to ensuring that your camera and tripod head are level, the most important secret to success in panorama shooting is to include sufficient overlap between each panel. While too much overlap might cause problems when stitching, too little certainly will. I aim for about 50% overlap, but a value as low as 30% can work. Keeping overlap low (but above 30%) means fewer individual segments are needed, speeding up the shooting time.
With ultra-wide lenses that typically exhibit a lot of distortion at the corners of the frame, it’s better to be generous with the overlap. Even then, programs such as Adobe Lightroom and Photoshop can have trouble stitching segments shot with 10-mm to 14-mm lenses. It’s wise to experiment with test panos taken at home to see what works with your gear and software before heading to a remote location.
Regardless of which lens you choose, you can shoot with the camera either in landscape or portrait orientation. The latter provides more vertical coverage and is often used for Milky Way arch panos. The drawback is it requires more segments to cover the scene horizontally.
For Milky Way arches, shoot with a lens that will provide enough coverage vertically to take in not just the Milky Way but at least 20° of the sky above it. When stitching a panorama for a rectangular final image, the top few degrees of sky will be so badly distorted that you’ll need to crop that region out of the final image. Plan your framing accordingly.
For any panorama, especially those captured with very wide lenses, shoot an extra segment on either end of the sequence. The end segments will also get distorted in the final stitch and will need some cropping. In other words, always shoot more of the scene than you’ll need for your final photo. I also prefer to shoot from left to right, as it makes viewing the segments easier in an image browser when sorting images in ascending order of capture time or filename, my preferred setting.
Milky Way panos on dark nights are often best shot in two passes. One is with short exposures (30 seconds or less) at a high ISO for the sky (to avoid star trailing in untracked panos). The other is captured with a longer exposure (perhaps a minute or more for each segment) and at a lower ISO with the lens stopped down in order to record more depth of field and detail in the foreground.
To keep noise in check, I prefer to shoot single, tracked segments for the sky and long, untracked segments for the ground, all at low ISO settings, rather than stacking multiple, short, high-ISO exposures. Stacking complicates the workflow since it requires the extra step of creating stacked intermediate frames before stitching can begin.
I also find today’s AI-noise-reduction routines so effective that, for nightscapes at least, stacking is not as essential as it once was. This is especially true for panoramas where any noise speckling will appear tiny in the final image.
Easy AssemblyWith your set of panorama images on the computer, the next step is to mosaic them together. I first process each raw file as thoroughly as possible, using identical settings for each segement. My preferred software is Adobe Camera Raw (ACR), but Adobe Lightroom has identical functions. For simple panoramas I’ll first try the Merge to Panorama command. It can work great, with one click. Or it can fail frustratingly, often on scenes similar to ones it previously worked well on. Scenes over water or with dark end segments often can foil the software. If it fails, my next recourse is to
send the processed files into Photoshop and try its Photomerge command. This sometimes works for image sets that ACR or Lightroom balk at. The Adobe competitors Affinity Photo, Capture One, and ON1 Photo RAW also have good panorama stitching functions. But I’ve found that any sets that give Adobe’s software trouble usually also fail in the competitor’s programs.
For problem pans, and usually for 360° scenes and multi-tier panos, I resort to PTGui (which stands for Panorama Tools Graphical User Interface), a $160 program for Linux, MacOS, and Windows (ptgui.com). While it can process raw files from most cameras, it will not read any of the settings applied to the frames in other programs. So I export processed raw files as 16-bit TIFFs for each segment, then import the TIFFs into PTGui.
Hitting PTGui’s Align Images magically results in a seamlessly stitched and blended panorama . . . usually. Sometimes it also fails. In such cases the software at least indicates which segments have issues and offers the option to manually create alignment “control points.” This involves examining adjacent frames and clicking on identical stars or landscape features in each frame. The process can be tedious. And you have to know the sky well enough to identify the same stars on multiple frames.
I always export the stitched segments to a layered Photoshop file (PSD). This allows me to manually edit the automatically generated masks to fix minor issues such as horizons with “fault lines” resulting from PTGui aligning on the moving stars, rather than on the stationary ground. Be warned: Even single-layer panos can be tens of thousands of pixels wide and many gigabytes in size. This will likely tax the ability of your aging computer to process and save them.
A key feature of PTGui is that for 360° scenes you can rotate and move the entire scene around to improve the final composition. Other programs, if they work at all on such scenes, can’t do that. What they give you is what you get.
Although all stitching programs can be balky at times, the results can be wonderful, and much easier to create than in the old analog days when we had to cut and paste (literally!) prints together to make panoramas. Try some simple panos to start. I think you’ll soon be hooked on the wide-fields and pixel-peeping resolution that panoramas can provide.
 PTGUI PROJECTIONS The dedicated stitching program PTGui can handle complex panos, like this one consisting of 40 segments (four strips of 10 images each), merging them using a choice of map projections, such as Circular fisheye. The latter style of 360° panorama is possible only with sets of images that cover the entire sky from horizon to zenith.
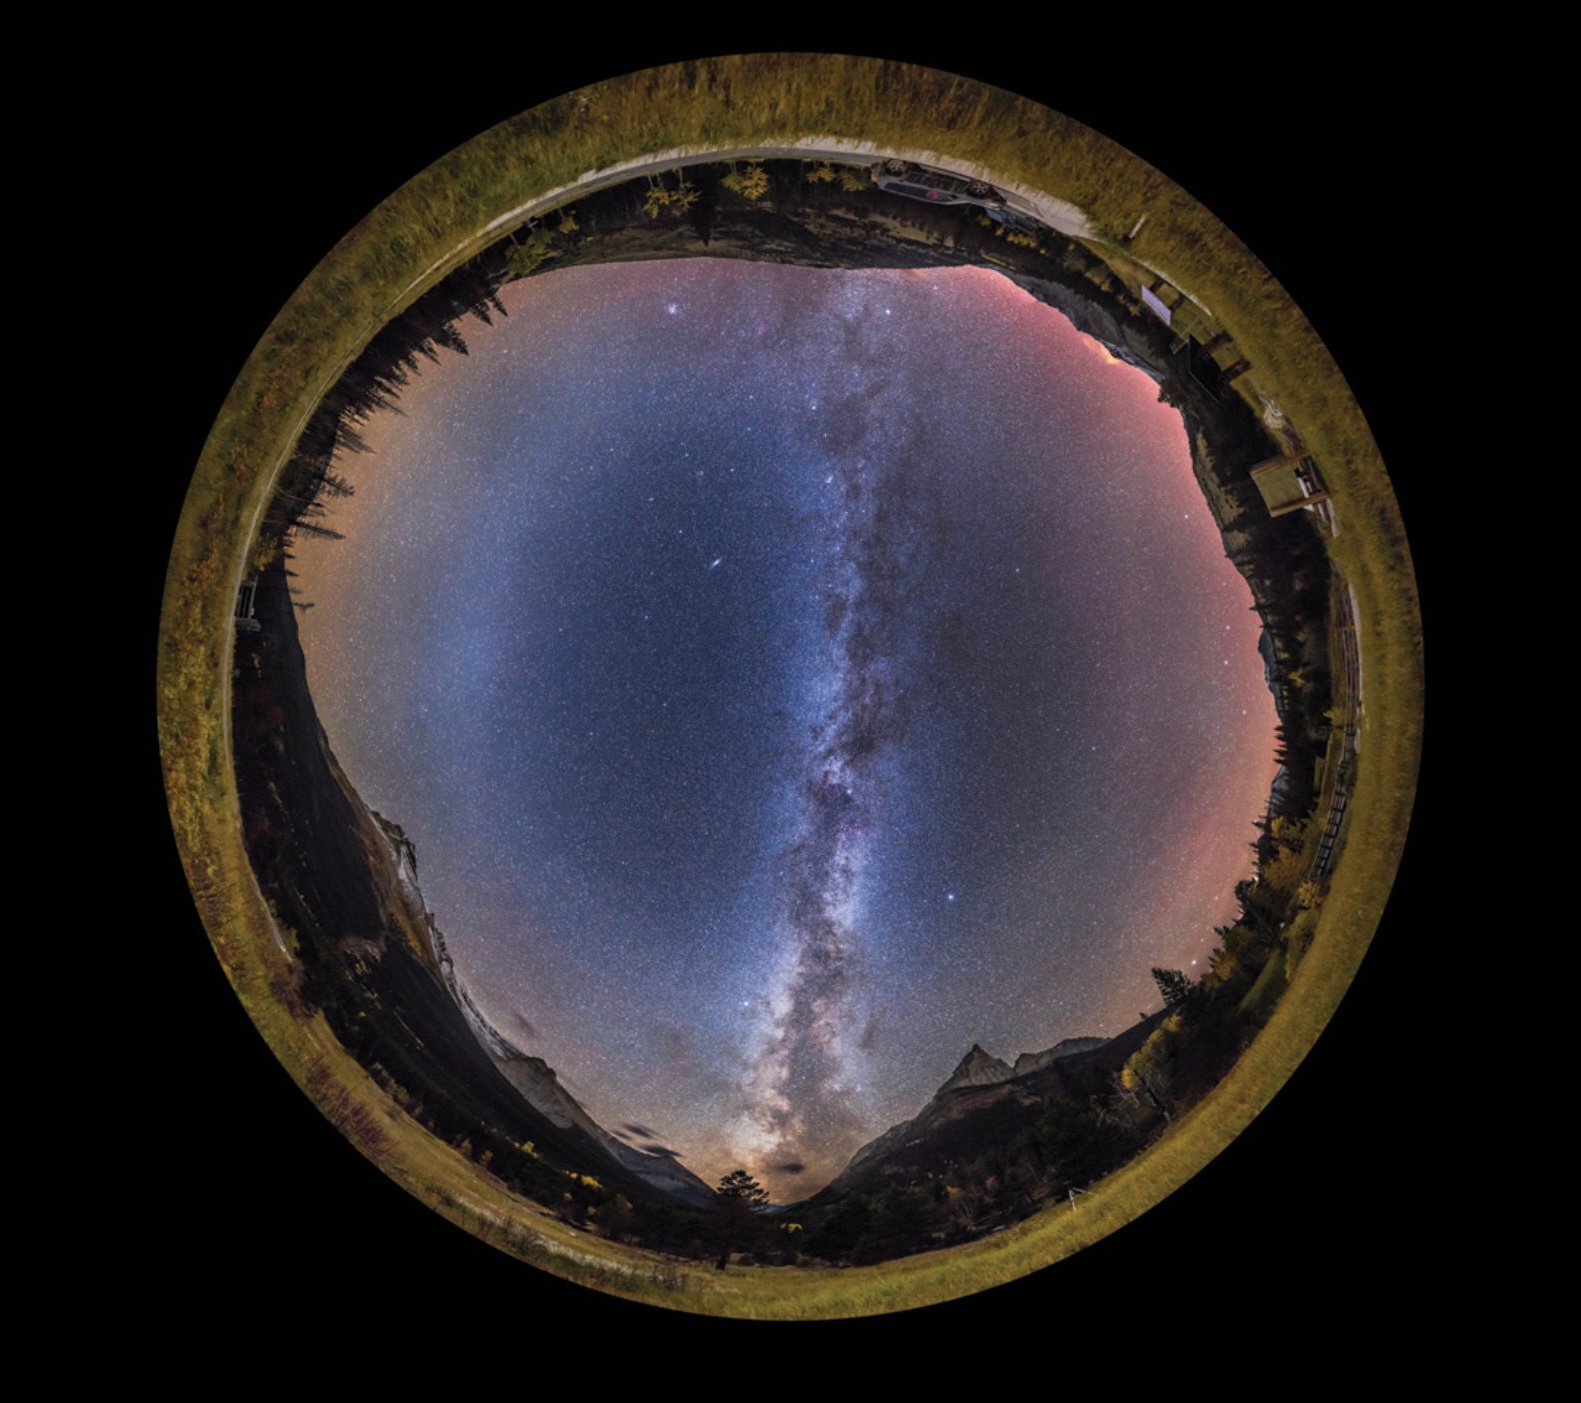 Fisheye panorama
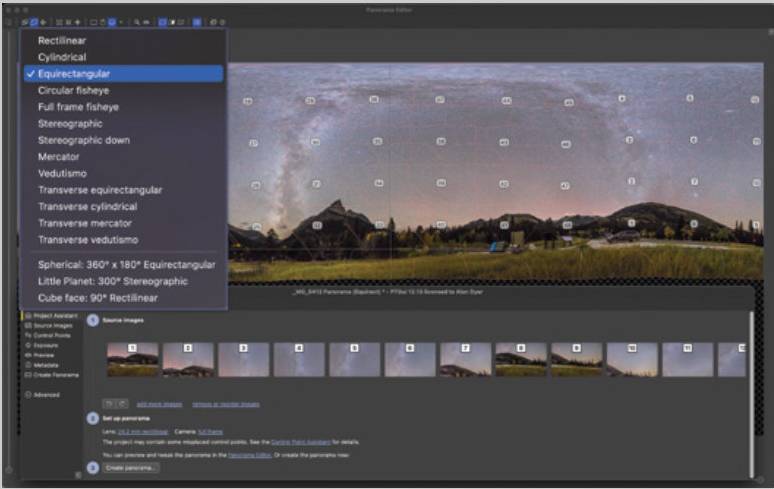 Another choice for map projection when merging is Equirectangular, with the result shown below.
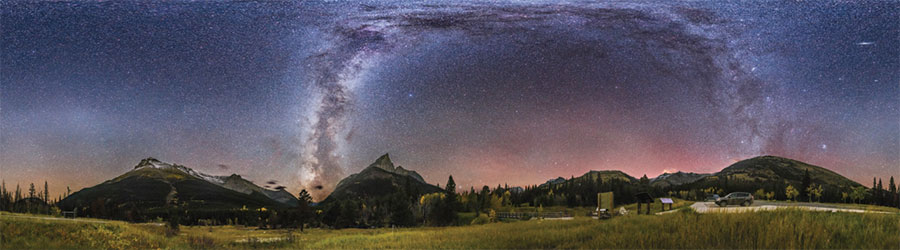 Alan Dyer
A gallery of Alan Dyer's panorama images can be viewed at https://is.gd/nightpanos.
This article originally appeared in the February 2023 issue of Sky & Telescope.